Pages

Bologna to Bolognese: Adventures With Food

Food is necessary. Food is fun. Food is an adventure!

My name is Shannon and this is my adventure, my love affair with food.

I hope you'll come along for the ride.

Sunday, November 30, 2014

Tossed Together Turkey Tortilla Soup


Turkey with all the trimmings, turkey sandwiches, turkey noodle casserole, you've done it all and there is still leftover turkey. If you're wracking your brain for how to spice up the last of those leftovers this is the perfect answer. Turkey Tortilla Soup!

I love turkey and I'm all over leftovers but there comes a point where just the sight of turkey leaves me cold. I've found it best to dissect the carcass Thanksgiving night and parcel it out right away into quart bags for freezing. (Freezers baby, the best appliance ever. Aside from my washing machine without which I am certain I would die. I'd at least be very dirty.) I keep the choicest breast bits for day after leftovers and sandwiches and the rest gets bagged up for future nights when I need something quick and I'm all out of fresh options. 

But I digress, my quick and easy weeknight desperation meal is usually tacos because I always have most of the ingredients on hand, except for the day I was out of ground beef.  I'd not made it to the grocery store the day before and completely forgot that I'd already used the last of the frozen ground beef so I was momentarily at a loss when I unearthed this frozen bag of turkey labeled "For Soup". I'm fairly certain I intended to make white chili but I never have the ingredients for chili in my pantry and whatever I made had to be crock pot friendly. Which is how this soup was born.

 
Turkey Tortilla Soup

Ingredients:

1 lb (approximately) shredded turkey
1 can black beans (rinsed)
1 cup frozen corn (canned or fresh is fine also)
1 onion chopped
1 tsp onion powder
1 tsp garlic powder
1 tsp paprika
1 tsp black pepper
1 tsp salt
1Tbsp cumin
1 cilantro seasoning cube (optional - fresh cilantro when serving would be better)
3 Tbsp apple cider vinegar
1 large can of stewed diced tomatoes with liquid
1/2 can of water (use the tomato can)

Preparation:

Combine all ingredients in a crock pot and cook on low for 6-8 hours. Stir occasionally and adjust seasoning to taste. Serve topped with crushed tortillas, shredded cheese and a dollop of sour cream.

It is that easy. If I were to change anything next time I'd add some chili pepper. Either a few jalapenos or birds eye chilies or some dried red pepper flakes. Whatever you have on hand.

Wednesday, November 26, 2014

Savory Sausage Cranberry Tart

 
Thanksgiving is just a few days away and if you haven't already made your menu or you need a last minute side to take to a gathering then may I suggest this gem. A rich savory treat, a little goes a long way. This combination of tart cranberries and spicy sausage in a flaky crust is to die for!
 
I've been making this tart for about 8 years now and I look forward to it every year. Initially I needed a side to take to an office party and I really wanted something with cranberries and I didn't want to take a dessert. I found a recipe for a breakfast tart and adapted it to fit my needs. You may get funny looks the first time you serve this but I promise once you've got them hooked they'll be begging for more.
 

Savory Sausage Cranberry Tart

Ingredients:

1 refrigerated pie crust (1/2 of 14.1-oz. pkg.)
1 pkg fresh cranberries divided in half (approximately)
1 pkg ground sausage (I prefer spicy or sage flavored pork sausage)
1 tsp ground sage
1 tsp thyme
1 tsp garlic powder
1-2 onions diced
4 stalks celery diced
2 eggs, lightly beaten
1 pkg (8oz) shredded cheese
½ cup whipping cream

Directions:
 
Preheat oven to 375°F.  Cook sausage in large skillet over medium heat until browned, stirring frequently. Reserving some of the fat drain the sausage and remove from skillet; set aside.
In the reserved fat in the same skillet sauté onions, celery and 1/2 the cranberries until soft. Be careful as the cranberries will occasionally pop with the heat. Allow to cool. In a large bowl combine eggs, spices, cheese, onion celery and cranberry mixture, cream and sausage; mix well. Press pie crust into a tart pan and pour in the filling. Top with remaining cranberries. Bake 30 - 45 minutes or until knife inserted in center comes out clean and crust is golden brown. 
 
 
Feel free to adjust the spice to taste. Sage can be overwhelming so if you use the sage flavored sausage or are sensitive to that flavor I might cut it in half. Additionally if you don't eat pork, turkey sausage can certainly be substituted but you may need to add some butter or add some additional seasoning to amp up the flavor. I hope this festive favorite finds a place on your holiday table. Happy Thanksgiving!


Monday, September 2, 2013

"Everything But The Kitchen Sink" Bread


It seems time for personal interest is now at somewhat of a premium in my life with my little one becoming mobile and more bold by the day. It seems each time I think I am prepared to restart my blogging I find I can't quiet get back on track. Regardless I think I'll give it another go because I miss sharing the goodies that come out of my kitchen! This week's gem was born of a craving for banana bread and the desire to not pack the baby in the car and make a trip to the market for additional ingredients. I must say I'm grateful though as resourcefulness was certainly the mother of a tasty invention "Everything But The Kitchen Sink" Bread.


It all started with a banana. I had been saving the last two icky spotted bananas for my favorite banana bread. Then the day I came downstairs to make it I found just one banana. (It turns out my husband is willing to eat very ripe fruit.) So now I was left with the ugly banana and no way to make the bread. I foraged around in the fruit bowl and came up with a wizened apple and the fridge yielded some leftover pineapple and after some consideration I decided it would do. (Really all you need is enough moisture for the bread and something that will have good flavor.)


"Everything But The Kitchen Sink" Bread

Ingredients:

2 cups flour
1/2 tsp baking powder
1/2 tsp baking soda
1/2 tsp salt
1/2 cup butter
1 cup sugar
2 eggs
1 cup mashed fruit (In this case 1 banana and 1/2 can of drained pineapple chunks)
1 chopped apple (optional)

Preparation:

In a food processor blend the pineapple and banana until  well combined. Transfer to a mixing bowl and add the other wet ingredients. Mix until well combined. In a separate bowl combine the dry ingredients. Slowly add the dry ingredients to the wet, mixing continuously.  I like to add mine in three chunks. Once your batter is smooth pour it into the greased and floured baking vessel of your choice (Loaf pan, muffin tins, bunt pan, whatever you like) and bake in a preheated oven at 350 degrees for 45-5- minutes.


This is a rich dense bread and should come out golden brown and delicious. I used my favorite Banana bread recipe as the base "Sheila's Banana Bread from the book "Bountiful Ohio Good" by James Hope and Susan Failor. I find it a simple and versatile base that always yields great bread so adapt and have fun!

Sunday, June 9, 2013

Roasted Sweet Potato Salad


Again the blog has been suspiciously silent as my attention has been diverted by a certain sweet boy. With all the new and delightful things he does each day I have slipped into a routine of easy unimaginative meals eaten quickly before little hands can snatch it off my plate and fling it to the floor. So I am of two minds with this weeks post. You should have seen this back in November and for that I am sorry. However I have this to share with you at a time when I've been too busy to make much of note and for that I am grateful. If you've followed the blog for a while you may note that this has a feel similar to the Harvest Pasta but it is it's own dish and a very nice twist on your traditional potato salad.


Roasted Sweet Potato Salad

Ingredients:

2 sweet potatoes
1 acorn squash (or firm, in season squash)
1tbsp garlic diced
1 tsp cumin
1/4 tsp allspice
1/4 tsp nutmeg
1/8 tsp cayanne
1 onion
1-2 tart apples
lemon juice
s & p to taste
2tbsp balsamic vinegar
2tbsp basil vinegar

Preparation:
 
Preheat the oven to 450 f. Dice the onion and cube the sweet potatoes and squash and spread in one flat layer on an oiled baking sheet. Drizzle the vegetables with olive oil and sprinkle the spices over top. Roast until tender (approximately 30-45 minutes) but not mushy. While the vegetables are roasting dice the apple and lightly dress it with lemon juice to prevent browning. Make the dressing by combining the salt, pepper and vinegars. Once the vegetables are done roasting remove them to a bowl and allow them to cool. Add the apple and the dressing. Taste and adjust flavors as needed. Some freshly grated nutmeg and a rough dice of some tarragon would be a nice finish.

This could also be made with grilled vegetables, some rough chopped nuts would add a nice crunch  and if you prefer a creamier potato salad you could add 1/4 cup good mayonnaise. Overall a fun and tasty alternative to traditional sides and perfect for any summer barbecue.


Saturday, April 13, 2013

Brilliant Butterfinger Cake


So after a much longer hiatus than anticipated I am finally ready to settle back in and share some of the yummy goodness that has been meandering through my kitchen these past few months. I can think of no better way to celebrate the blog's return than with a decadent celebration cake I made for my husband's birthday. He loves peanut butter and if it's combined with chocolate all the better. So this year I decided to make a chocolate peanut butter cake. This is not just any chocolate peanut butter cake though. It's a three layer chocolate fudge cake dotted with peanut butter chips, sandwiched with fluffy peanut butter icing, then smothered with chocolate icing and topped with crushed Butterfingers candy.

Now we were out of town until right before his birthday so I had to cheat a little since I didn't have all the ingredients to make this from scratch. However there are numerous recipes available online both for the cake and the chocolate frosting. The chocolate frosting is actually one thing I definitely intend to change next time I make this sinful sweet. This time I used a prepared icing but next time I intend to top this cake with the thick fudge like icing my grandmother used to make for her icebox cake.

So understanding that these substitutions were for the sake of time, here's my version of a chocolate peanut butter cake.

Ingredients:

Cake:

1 recipe of your favorite chocolate cake (or 1 box mix)
1/2 package reeses peanut butter chips
1/2 cup chocolate syrup (optional to use as a substitute for some of the required liquid in the recipe)


Peanut Butter Icing:

1 cup peanut butter
5 tbsp real unsalted butter
1 cup powdered sugar
3 tbsp milk or cream
3/4 tsp vanilla
pinch of salt

Extras:

1 recipe of your favorite rich chocolate icing (or 1 can prepared chocolate icing)
1/2 bag of butterfingers fun size candy bars crushed

Preparation:

Start with your favorite chocolate cake recipe (or in a pinch box mix). Since the peanut butter is such a strong flavor you will want to have a good balance so I find that a dark chocolate cake or a fudge chocolate cake is best to make sure the chocolate flavor is intense enough. I have listed chocolate syrup as an optional ingredient. I substituted chocolate syrup for part of the water called for by my box mix to add more chocolate flavor. It worked well but is not necessary.  Prepare the cake to specifications, add in the peanut butter chips, and separate evenly into three oiled and floured 9 inch cake pans (9 inch pans are ok too). Bake until a toothpick inserted in the center comes out clean. Allow cakes to cool for at least ten minutes then remove from the pan and move to a rack to cool completely before icing.


Now for the peanut butter icing. This seemed easy enough and everything I read said it should be simple. All the same my first batch curdled on me and was a complete disaster. So I started over and was more careful. Start by creaming together the peanut butter and butter in a stand mixer. Add the powdered sugar a little at a time. Next a pinch of salt and the vanilla, then add milk a tablespoon at a time until icing reaches the desired consistency. The icing should be fluffy and smooth and about the same, only slightly thicker, consistency as regular buttercream. Don't try using margarine for this you need real butter and if you use natural peanut butter you may have some separation issues so be aware. If your icing is too thin add more powdered sugar, if it is too thick add a smidge more milk.

Now you are ready to assemble. Place your first cake layer down on your platter and top with half the peanut butter icing. Sprinkle a generous layer of crushed Butterfingers over the icing. Top with the next layer of cake, the second half of the peanut butter icing and another sprinkle of Butterfingers. Top this with the final layer of cake and ice the whole thing with chocolate icing. Decorate the top of the cake with more crushed Butterfingers mounding them up slightly in the middle.


If you can hold off digging in long enough to serve this to people it will be a hit. (If you can't, blame it on the kids or the dog! They'll love it anyway!) Oh and don't expect any leftovers.


Sunday, October 28, 2012

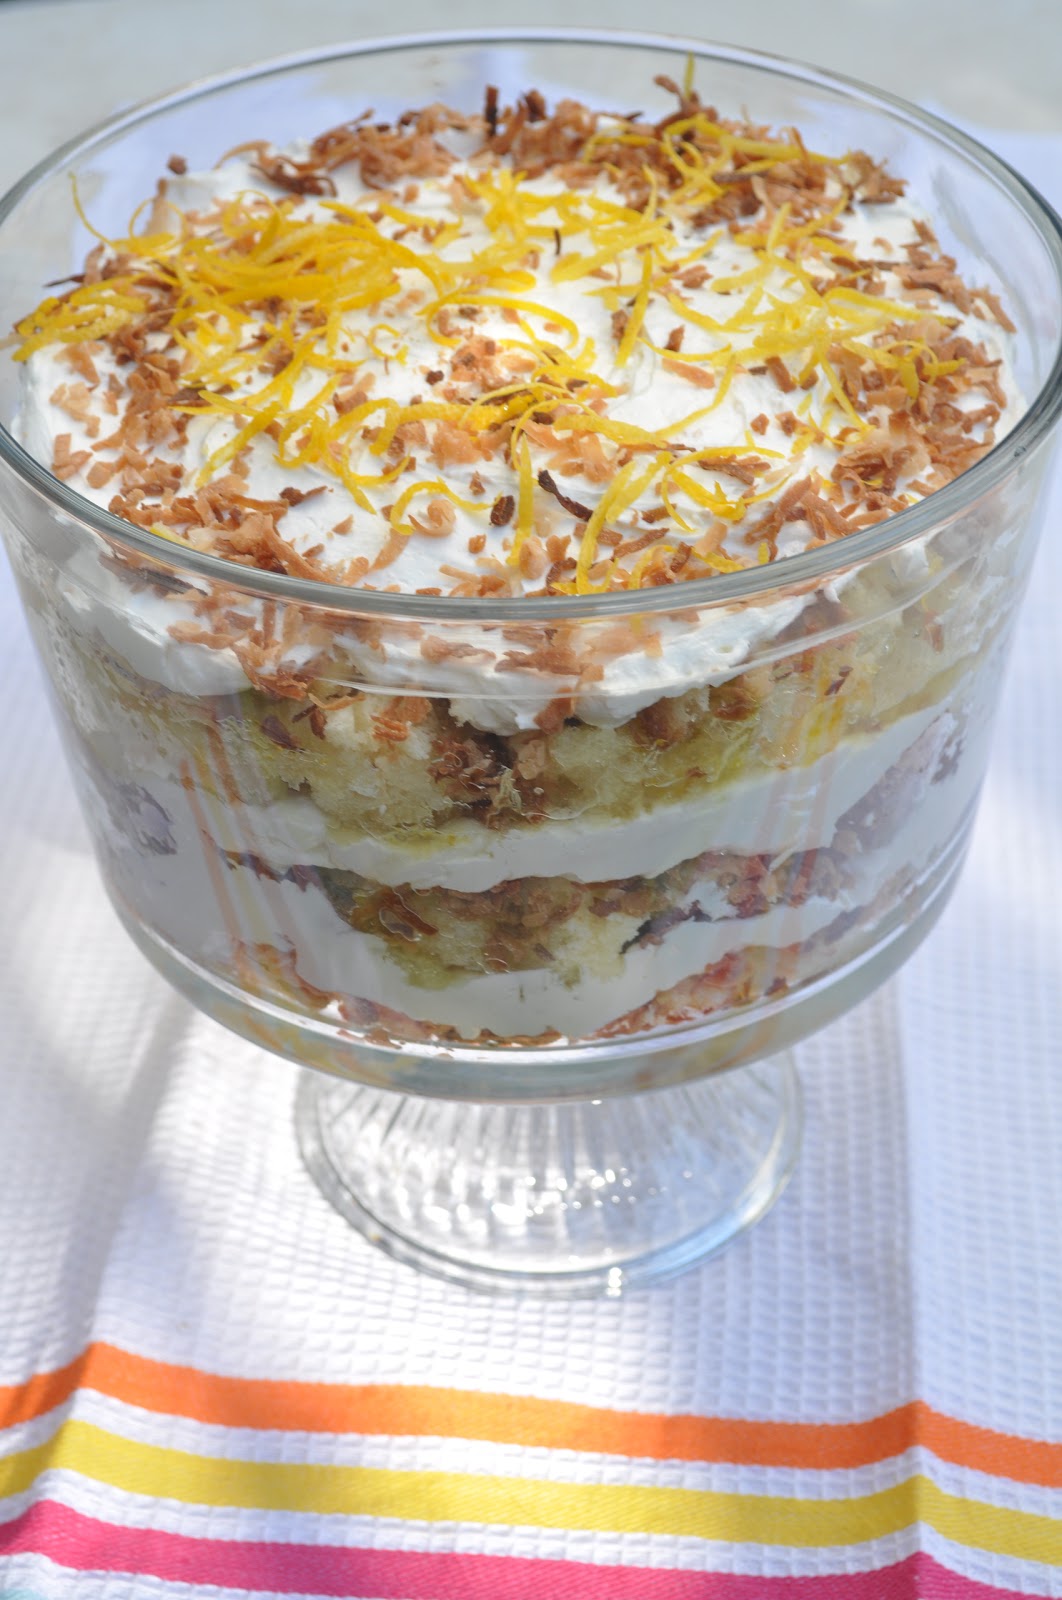
Luscious Lemon Coconut Trifle


Sometimes a special occasion calls for something fancy and complicated. Other times it calls for something simple and delicious that just looks complicated.  If the later is your kind of dish then Trifle is the dessert for you. There are so many versions of Trifle but the basics are the same. you need some sort of cake, some sort of liquid and something squishy. Now typically you'll see recipes call for pound cake or lady fingers but I've made trifle with gingersnaps too. 

This particular concoction was for a Scentsy party where we all brought food inspired by the different wax scents. I'm a sucker for coconut and citrus so when that combo came my way I knew I had the perfect dessert. So here you have it, Lemon Coconut Trifle.


Lemon Coconut Trifle

Ingredients:

3 Lemons
1 c sugar
12 oz whipped cream
5-8 oz lemon curd
1 cup of toasted coconut

1 recipe of Simple Sugar cake http://bolognatobolognese.blogspot.com/2012/09/simple-sugar-cake.html  made without the fruit but with the inclusion of 1 1/4 tsp coconut extract and 1/2 cup shredded coconut.

Preparation:

Start by making your cake. While it is baking spread your shredded coconut on a baking tray and just before the cake is done put the coconut in the oven to toast. Watch that it doesn't burn.

Juice the three lemons until you have 1 cup of lemon juice. Pour the lemon juice and zest of two lemons in a small pot on medium heat with one cup of sugar. stir until sugar dissolves. allow mixture to come to a boil and reduce the heat allowing it to simmer until thickened to the desired consistency. Remove from the heat and allow to cool slightly. Make your whipped cream and lemon curd ahead of time or purchase your preferred store bought variety. Before assembling the trifle gently fold the lemon curd into the whipped cream being careful not to over mix.


Now for the assembly. Tear the cake into slightly larger than bite sized pieces. In a trifle dish or glass bowl of your choice begin with a layer of cake. Pour some of the lemon syrup over top (about a tablespoon or two) sprinkle some toasted coconut next and then top with a layer of the whipped cream lemon curd mixture. Continue to layer until your Trifle dish is full ending with a layer of the whipped cream and curd mixture. Garnish with toasted coconut and lemon zest. This desert is best served after being allowed to sit but the last whipped cream layer should not be added until just before serving.


I prefer to make all of my components from scratch as I think it yields a better taste. However with that said I promised easy and fuss free so you can make this with entirely store bought components with little effort. A regular pound cake or one made from a box mix would do for your base, you can buy lemon syrup in many liquor stores or where bar supplies are sold, whipped cream is readily available and lemon curd should be easy to find in your local grocery either with the jams and jellies or in the international food aisle (think England).


Once assembled it will hold for about a week in the fridge, but that's only if it lasts that long! Of course don't forget that this is just one of many versions. If lemon and coconut don't appeal to you change it up and try a chocolate orange trifle or make up your own combination of your favorite flavors. Whatever you do have fun and make it your own!

Sunday, October 21, 2012

Handy Beef Hand Pies


While casseroles are a wonderful go to vessel for an easy evening meal, sometimes you just want a quick bite. Instead of choosing store bought microwavable pastries consider making your own easy tasty Hand Pies. Hand pies, pasties, samosas, pocket pies, whatever you call them these lovelies have been providing a quick, easy hearty lunch for ages. They are so simple to make once you've made a few you may find the more processed ones aren't so appealing anymore.

This recipe is ground beef and vegetables, very similar to what you would put in a cottage pie. In fact the main difference is that with the cottage pie you want a nice gravy where here you just want well spiced meat without the added moisture.


Handy Beef Hand Pies

Ingredients:

1 lb ground beef
1 onion
1 14 oz bag of frozen vegetables
3 medium potatoes boiled and diced
1 tsp crushed bay leaves
1 tsp ground sage
1 tsp thyme
1 tbsp minced garlic
2 tbsp Worcestershire sauce
salt and pepper to taste
Pie dough for a two crust pie (you can make your own or buy pre made crust)

Preparation: 

In a pan brown the ground beef draining off any excess fat. Add in diced onion and seasoning and saute gently until the onion is translucent. Remove from the heat, mix in the diced potatoes and mixed vegetables. Allow the mixture to cool.

Roll out your pie crust and cut into 8 equal portions. Fill each of the 8 pastry sections with a couple of tablespoons of the filling and seal each crimping the edges with a fork. Place the pies on a foil lined sheet and bake for 230 minutes in a 350 degree oven or until crust is flaky and golden brown. Remove the pies from the oven and allow to cool completely. Seal in freezer bags separated by a piece of wax paper to avoid sticking. When you are ready to reheat you can always pop them in the oven for a flakier crust or just pop them in the microwave for about 2 minutes or until heated through.

These little darlings could easily be made with whatever filling you prefer and are a great way to use up leftovers. How about that Thanksgiving turkey, dice up your leftovers and voila turkey stuffing pockets, turkey cranberry and brie pockets or get some ham and make turkey ham and cheese pockets. The options are limitless so experiment and enjoy!

Sunday, October 14, 2012

Carefree Chicken Pot Pie


There is something about fall that makes me long for comfort foods. As the chill begins to set in anything warm and familiar holds a particular charm for me. So as I began to plan some freezer meals for after our little one arrives one of my first thoughts was Chicken Pot Pie. What could be more comforting than tender chicken and vegetables in gravy tucked away in a lovely flaky crust. What's more it only takes minutes to throw together and it is so much healthier than the store bought variety.

Chicken Pot Pie

Ingredients:

2-3 chicken breasts
1 bag of frozen mixed vegetables or 1lb of your favorite veggies diced small
1 onion diced
1/4 c flour
8 oz chicken stock
2 tbsp garlic minced
1 tsp sage
1 tsp thyme

1/2 tsp rosemary
Salt and Pepper to taste
Crust for 2 crust pie

Preparation:

Cook the chicken breasts as desired. I poach mine but you could also roast them or dice and saute them in a pan. If you poach them place them in pan and just cover them with water then bring to a boil. Boil for 3 minutes then remove from the heat and cover. Allow chicken to rest for 15-20 minutes or until completely cooked through. Drain the chicken, allow it too cool and dice into bite sized pieces.

Prepare your pie crust. You can buy a crust ready made, use a box mix, or make your own. I will not lie I buy a ready made crust. In a bowl, combine your chicken and vegetables. (If you decide to use fresh vegetables hold off on this step.) Pour this mixture into your pie crust.

In a deep skillet saute your onion in a bit of butter. Just before the onion is translucent add the flour a bit at a time until you have enough to make a good rue. Add the chicken broth whisking constantly to avoid clumping. Once you have a consistently smooth gravy going add your seasonings and bring to a boil then reduce the heat and simmer until it reaches the desired consistency. Remove from the heat and pour over the chicken and vegetables. Top with your second pie crust and crimp edges. Allow to cool completely before freezing.

To prepare your pot pie from the freezer, shield pie crust edges with foil then place on a baking sheet. Bake at 425° for 1 hour and 15 minutes or until crust is golden brown. Remember every oven is different so check your pie often after the first 45 minutes (through the window, don't open that door!) and don't forget to take the foil off the edges in the last 15 minutes. It could take a bit longer or be spot on. Either way allow the pie to rest for 15 minutes before cutting and serving. Then just sit back and enjoy!


Thursday, October 11, 2012

Terrific Thai Chicken and Rice Casserole


The next few weeks you will see a number of easy to prepare and freeze foods on the blog because my husband and I are expecting a very special delivery. Our first child is due this month so as the date gets closer I have been preparing some freezer meals to make dinner time easy once baby arrives. These meals aren't just great for soon to be parents though. These time savers can make sure your family, regardless it's size, has great homemade food any night of the week no matter how busy your schedules may get. So roll up those sleeves and get ready to cook. One day in the kitchen can mean a freezer full of easy to prepare treats!

My first freezer meal is an exotic twist on an old favorite. Look in any casserole book and you will find a chicken and rice bake. These are great and always good but I didn't want a freezer full of foods that all taste the same (think chicken pot pie, roast chicken, chicken noodle soup...). So when I got to this I decided some Asian flair was just the thing. So here is my recipe for  a chicken and rice casserole Thai style.


Terrific Thai Chicken and Rice Casserole

Ingredients: 

2-3 boneless skinless chicken breasts poached and diced
1 large onion diced
1 red bell pepper
2 tbsp garlic minced
3 cups cooked rice
1 package of frozen vegetables (stir fry style)
1 can coconut milk
1 tsp lemongrass powder
1 tsp ginger
1 tbsp parsley
1-2 tsp corriander
1 tsp garam massala
1/4 - 1/2 tsp cayenne
8-24 oz chicken broth
Salt and pepper to taste


Preparation:

Poach the chicken breasts by placing them in pan and just covering them with water then bring to a boil. Boil for 3 minutes then remove from the heat and cover. Allow chicken to rest for 15-20 minutes or until completely cooked through. Drain the chicken, allow it too cool and dice into bite sized pieces. Set aside.

Prepare your rice according to package directions removing it from the heat just a few minutes before it is completely done.

Dice your onion and add it to a pan with some butter. Saute over medium low heat until softened, add the red pepper, continue to saute until onions are clear and pepper is tender but not mushy. Add your spices and minced garlic. Next add in your coconut milk and chicken stock. I used a coconut paste when making this dish so you may need less stock to get a good gravy. Taste as you go and adjust as necessary. You will want the sauce to be creamy and fragrant but not too thick and remember that the rice will soak it up so don't skimp on the liquid unless it affects the taste too much.  Bring the mixture to a boil and, stirring regularly, allow to reduce until it reaches your desired consistency (about 3-5 minutes).


In the pan you will be freezing this dish in combine the rice and frozen mixed vegetables, mix well. When sauce is complete remove from the heat and pour over rice and vegetable mixture. Mix thoroughly and smooth out in pan. Now you are ready to freeze or bake as you choose.If you are preparing this from frozen place, covered, in a 400 degree oven for 45-60 minutes or until heated through.  If baking it fresh you should be able to cut the temperature to 350 for 30-45 minutes but keep a cover on it or your rice will get crunchy. Enjoy!

Thursday, October 4, 2012

Tasty Tomato Jam


This summer I had my first truly successful garden and surprisingly, since we recently moved to the Pacific northwest, my tomatoes were my best crop. So as the summer came to an end I found myself with a large crop of ripe tomatoes. Large enough that I couldn't quite eat all of them by myself. Luckily I was pointed to this recipe for Tomato Jam by a group page I follow on Facebook called "Canning Granny". The initial recipe came from the blog  "Food in Jars" and you can find it here: http://www.foodinjars.com/2010/09/tomato-jam/

As I have said many times I rarely follow a recipe exactly. So I did make a few adjustments though mostly only to accommodate what supplies I had on hand. I will say at first I was a bit skeptical of this jam and couldn't imagine what it might taste like but the end result is delightful and I keep thinking of new ways I would like to try it. Give it a shot and see for yourself what delicious concoctions might be in store!


Tomato Jam 

Ingredients:

2 1/2 pounds tomatoes, finely chopped (skins and seeds included)
1 3/4 cups sugar
4 tablespoons lime juice
1 teaspoon ground ginger
1/2 teaspoon cinnamon
1/4 teaspoon ground cloves
1/2 tablespoon salt
1/2 tablespoon red chili flakes

Procedure:

Combine all ingredients in a large, non-reactive pot and bring to a boil over medium heat. Boil for ten minutes before reducing the heat to a simmer. Simmer for an additional 45 minutes to an hour stirring regularly. The mixture will reduce and begin to thicken. Remove from the heat when jam reaches desired consistency.  (It should "sheet" off the spoon in one big drop instead of many little ones)

While your jam is cooking you should have the jars sterilizing in your processing pot. After removing the jam from the heat fill jars to within 1/4 inch of the top and seal with lids. Process in boiling for 20 minutes.

After 20 minutes remove the jars from the water bath and allow to cool. Label and store in a cool dark place.


There are a couple things I will likely change next time. I would like to have gotten more of the spices particularly the red pepper flakes so I think I will double that (I like some bite!) or maybe add some cayenne. Additionally I think using fresh ginger, as recommended in the initial recipe, would have made a world of difference so I intend to make sure I have that on hand next time.


This jam is unusual but fantastic. Just think a little outside the box and you will find all sorts of places to use it. I like it with some sharp cheddar cheese, on a BLT or a turkey and bacon sandwich. The only limit is your imagination so cook it up and have fun with it!

Friday, September 21, 2012

Gratifying Guinness Stew


As the leaves change and autumn approaches I find myself craving warm hearty comfort foods. Nothing fits the bill better than a hearty stew full of delicious root vegetables and tender meat. So when I recently hosted a dinner night for friends my choice for the main dish was this gratifying Guinness Stew. 

Guinness stout forms the base for your flavor pallet in this stew and it's rich deep roasted barley flavor is perfect for a comfort food dish. Add to that a rich beef broth and sweet carrots and parsnips and you are well on your way. You do need to be careful though because Guinness has a touch of bitterness that balances it's hearty richness and with cooking this can dominate so a touch of extra sweetness is necessary. You can adjust the spices to your taste but I have found the recipe below, my own compilation, to produce consistently delicious results!


Gratifying Guinness Stew

Ingredients:
 
(Makes approximately 12qts)

1 bottle of Guinness stout (1pint 6 oz)
3 lbs beef cubed (chuck roast or similar cut appropriate for stewing)
3 parsnips (about 2 lbs) chopped
4 medium carrots chopped
2 large yellow onions diced
4 ribs celery diced
2 cans of beef broth (14.5oz ea)
1 can diced tomato (14.5oz)
4 tbsp Worcestershire sauce
1 tbsp garlic powder
1 tbsp onion powder
1 tsp thyme
1 tsp rosemary
1 tsp bay leaf crushed
salt and pepper to taste
1/2 cup dark brown sugar
1/4-1/3 cup flour (for thickening)

Preparation:

Heat a tablespoon of oil in a large skillet on medium heat. Toss the cubed beef with some flour and add to the pan browning slightly on all sides. Remove meat from heat and deg-laze the pan with some of the beef broth or a small amount of the beer. Prepare all the vegetables and add to your slow cooker. Add the meat, seasonings and liquid but not the flour. Cook on low for 8-10 hours. In the last hour taste for seasoning and adjust as needed also add the flour slowly by sifting small amounts into the pot and stirring until you reach the desired consistency. ( I found just under a 1/4 cup of flour was enough and you do have to let it cook a bit before you can tell if it needs more so add with a light touch and be careful not to over do it.)
 

This dish is fantastic served with mashed potatoes, col cannon, yorkshire pudding soda bread or any other delightful starchy goodness you have on hand. Sometimes I put potatoes in it but I like having them mashed on the side a bit better because then you still have the chunky root veg in the stew but you can pour it over a nice bowl of buttery mashed potatoes for extra richness.

Tuesday, September 11, 2012

Spice Up Your Weeknight


This week most of the kids in my neighborhood started back to school and I thought what better blog topic than a healthy, easy and delicious weeknight dinner. For inspiration I turned to a relative newcomer on the foodie scene Aarti Sequeira, the winner of Food Network Star season 6. She not only has a delightfully bubbly personality but the girl is not shy with her spices! Aarti takes every opportunity to bring here Indian roots into easy dishes anyone can tackle and this one makes plain old ground beef really come to life. 

This week I made Kheema, which is Indian Ground Beef with Peas. You can find Aarti Sequeira's original recipe here:
I highly suggest following her exact recipe. However I am an opportunist and sometimes that means I have to adjust recipes to reflect what I have on hand. So, below you'll find that I did make a few changes. For one I like the flavor of onions sauteed in butter so I switched that out, then I didn't have fresh ginger on hand and I had to rely on tinned tomatoes. I must say I actually prefer the tinned tomatoes since they come packed in juice that lends itself toward a great sauce. Additionally I didn't have fresh Cilantro as mine has gone to seed. I substituted Parsley but the Cilantro would have been much better. It has a particularly beautiful flavor that goes so well with these spices. Finally I didn't have any pita bread on hand so I served this over pasta but I also thought macaroni would be a great way to get kids to try something new!

So here is a slightly altered version of Aarti Sequeira's Kheema recipe. Please enjoy and of course take time to try the original as well!


Kheema: Indian Ground Beef with Peas 


Ingredients:

1 tbsp butter
1 medium onion, diced
3 tbsp minced garlic
2 tsp ginger
2 teaspoons ground coriander
1 teaspoon paprika
1/2 teaspoon store-bought or homemade garam masala, (a recipe can be found by following the link to Aarti's original recipe)
1/2 teaspoon ground cumin
1/2 teaspoon cayenne, (Aarti lists this as optional, I used the 1/2 tsp and would suggest less to anyone who doesn't tolerate spice well)
1 pound ground beef
1 can diced tomatoes
1 cup frozen peas
2 teaspoons of your favorite vinegar (I used Basil)
1/4 cup chopped fresh flat leaf parsley, plus a few extra leaves for garnish
1/2 package macaroni

Preparation:

In a large skillet, melt the butter over medium heat. Add the onions and cook until translucent. Add the garlic and saute for another minute. Add the beef, and saute until the meat is no longer pink. Stir in the coriander, paprika, garam masala, cumin, cayenne and tomatoes, including the juice. Stir well making sure the spices are well incorporated.Add the peas and simmer until softened but still bright in color, 5-10 minutes approximately. Stir in the vinegar and chopped parsley. Garnish with more parsley leaves and serve over plain macaroni.

Sunday, September 2, 2012

Simple Sugar Cake


As I said in last weeks blog I had a plan for my beautiful bounty of berries and here is part two, a delicious and simple cake from the Finnish coffee table. Let me explain a bit before I go forward. In Finland taking coffee with a friend is nothing like stopping by your local coffee joint and grabbing a cup of joe to go. It's much more personal. When someone comes for coffee you lay the table with good cups and saucers, prettily folded napkins, plates, spoons and platters of goodies. Even at it's least formal "coffee" is a sit down affair. I remember my host mother's friend coming to coffee many times and she never arrived empty handed. She always brought a little something for her hostess and my host mother always had a table laid out with cookies or pulla or some other treat to enjoy with their coffee and conversation. Beatrice Ojakangas explains it beautifully in her book "The Finnish Cookbook" and it is from that same book that today's recipe harkens.

The first time I had this mildly sweet baked good I wasn't sure what to make of it. It looked more like blondies than cake to me and it wasn't nearly as sweet. However I was won over after the first bite. The simple "Sokerikakku" or "Sugar Cake" batter can be paired with any fruit making it the star and providing a delicious and unobtrusive backdrop. Since I have an abundance of blackberries I altered Ojakangas's recipe for Apple Sugar Cake or Omena Sokerikakku (found on p. 55 of "The Finnish Cookbook") to fit my needs. So here you have it Berry Sugar Cake or Marja Sokerikakku!


Berry Sugar Cake - Marja Sokerikakku

Ingredients:

1/4 c butter (at room temperature)
1 c sugar
2 eggs
2 cups sifted all purpose flour
1 1/2 tsp baking powder
dash salt
3/4 cup light cream (milk will do if you don't have cream on hand)
1 tbsp vanilla
2 c fresh berries of your choice

Preparation:

Cream together butter and sugar. Add the eggs and combine well. Sift the dry ingredients and add alternately with the cream. Add the vanilla. Mix well until the batter is smooth. Pour into a well greased 9x13 pan and top with the fruit spreading it as evenly as possible over the batter. Bake in a 350 degree (F) oven for 50 minutes or until top is golden and a toothpick inserted in the center comes out clean. (Make sure to not stick it in an area with lots of berries.) Allow to cool before serving.


This is wonderful served with vanilla cream which is not easily found in the states to my knowledge. Basically it is heavy cream infused with vanilla and sweetened. I have not, but I imagine you could make this by warming some heavy cream on the stove with part of a vanilla pod or just some good vanilla in it and some sugar. Heat the cream until the sugar dissolves and remove it from the heat. Then serve chilled over the cake. You could also make whipped cream and of course that would be fantastic as well.

Friday, August 31, 2012

Basic Blackberry Jam


As the summer begins to turn toward fall, the limbs of fruit trees and vines are heavy laden with rich ripe fruits. It takes me back to days of picking blackberries and raspberries behind my grandparents house and trips to a local orchard to pick apples and sip fresh cider. This summer, I got to revisit some of those memories by picking blackberries with a friend and as when I was younger I ended up with more than I knew what to do with. I had however gone into the endeavor with a plan. A plan for jam.

I am relatively inexperienced in food preservation, what you might call a dabbler. This means you won't see recipes for canned meat or soup or salsa but if it can be pickled or jellied or made into jam I'm your girl! So with my plethora of delicious ripe fruit I thought this would be the perfect opportunity to encourage others to answer the call of home canning as well.

Many call this a dying art but I think it has a niche and it's slowly catching on in a more mainstream way. It may not be canning as your grandmother did it but with easy recipes, plastic freezer jars and simple kits it isn't all hours of sweating over a hot stove in midsummer either. This recipe is the "Berry Jams Without Added Pectin" from the National Center for Home Food Preservation which offers a wealth of information on how to can, safety guidelines and recipes. Once you get a handle on the basics you can let your imagination run wild and oh the fun you will have.


Blackberry Jam

Ingredients:

9 cups berries
6 cups sugar

This recipe makes 7-8 half pints or 4-5 pints. (I got approximately 4 1/2 pints)

Gear:

Canning jars of your choice with lids
2 large non reactive pots
Canning tongs (Preferred but regular tongs will do in a pinch)
Wooden spoon
Funnel (make sure it fits your jars)
Ladel

Preparation:

Start by washing your berries. I washed mine in a sink full of cool water spiked with some white vinegar (to kill anything that might have hijacked a ride home, these are fresh berries after all) about 1/4 cup. I let the berries sink and skimmed off anything that floated to the top then added more water for a rinse and scooped them out gently with a spider (wire cooking tool - a slotted spoon would also work but remember to be gentle and not to crush the berries) and laid them on paper towels to dry.

While you are doing this it would be a good idea to set your jars on the stove to sterilize. You need to have them ready and still hot when your jam is done so timing is important. I suggest you read the section on sterilization here http://nchfp.uga.edu/how/can_01/sterile_jars.html but the basic are as follows.


To sterilize empty jars put them right side up in the bottom of a pot large enough that you will be able to completely submerge them in water. Fill the pot and jars with hot but not boiling water to about an inch above the tops of the jars. Bring to a boil and boil for 10 minutes. There are adjustments to be made for different altitudes so please follow the link if you live more than 1000ft above sea level.

Now to the jam. In your other large pot combine the fruit and sugar over a medium to medium low heat slowly bringing it to a boil. (Adjust the heat as necessary but do not put it on high it can get out of control quickly.) Stir often and once the sugar has dissolved cook to the jellying point. This should take about ten minutes. Stir constantly during this time and do not leave your jam unattended. The jellying point is when the jam has reached a consistency where it sheets (instead of dripping) off a spoon dipped in the hot mixture or a temperature of approximately 220 degrees F. You can see more here http://nchfp.uga.edu/how/can_07/jelly_point.html.

Remove the jam from the heat and the sterilized jars and lids from the water bath. (This is where you'll want the tongs for the jars.) Drain the water from the jars (down the sink) and fill them with the hot jam using the funnel. You will want to leave "head space", about 1/4 inch of clear space between the top of the jam and the top of the jar. Make sure to wipe the rim of the jar with a clean damp paper towel and place lid and ring on top. Repeat till all jars are filled. Tighten the rings and carefully lower them into the still boiling hot water bath. make sure the water still covers the jars.  This step is called processing. Leave the jars in the boiling water for 5 minutes. Then remove carefully and wait. The jars should seal with a pop in short order as they cool. If you use jars larger than a pint or smaller than a half pint the processing time may be different again please refer to the NCHFP website for more information or guidance on the subject. They have a chart along with the original recipe for this jam here http://nchfp.uga.edu/how/can_07/berry_jams.html.


I highly recommend reading the various articles offered on the National Center for Home Food Preservation website before jumping into canning for the first time. There is specialized equipment available if you want it but you can also do some basics with a couple of good heavy non-reactive pots. So look around and decide what is best for you. I do recommend a basic canning utensil kit that you can find at your local grocery or big box store. It has a jar lifter, a lid lifter, a funnel, a bubble remover, and a headspace tool. They aren't expensive and it's better to have the right tools than to drop a hot jar of hot water on yourself or the floor while trying to use regular kitchen tongs. It can be done but at your own risk.


I hope this is inspiration enough to do a bit more research and to try your hand at canning. Don't let it intimidate you, it isn't as hard as it seems at first and there are some great sites out there where you can ask all sorts of questions from experienced canners if you are unsure about something or if things don't turn out as planned. The results are worth it as is the fantastic sense of accomplishment you will feel when you hear those seals ping!


Tuesday, August 21, 2012

Marvelous Moroccan Inspired Chicken


 So now that you know how to make Peerless Preserved Lemons, what do you do with them?  Well as I said there are dishes from around the world that call for them but my favorite is this Moroccan Inspired Chicken hotpot. A hotpot is basically an all in one dish where the flavors blend and meld in one big pot which is perfect for when you want something you can throw in the crockpot and forget about until dinner. The bonus with this dish is that it tastes exotic enough that people might believe you spent the day slaving over a hot stove to make it!

Now you may ask why I call it Moroccan Inspired and not just straight Moroccan chicken. Simply put I didn't follow a recipe exactly but I was inspired by a few. It started with Dorrie Greenspan's book "Around My French Table". I had received the book as a Christmas gift from my husband and I was dying to try some of the recipes. One in particular caught me eye and sounded divine, "Chicken Tagine with Sweet Potatoes and Prunes." I could taste it in my mind the sweetness of the potatoes and the prunes with the warmth of the spices, it spoke to me. You might wonder what this has to do with preserved lemons, but I'm coming to that. You see as simple as the recipe was, I didn't have a number of the ingredients. However they put me in mind of the many recipes I had seen online for Moroccan Chicken. the spices were similar as was the cooking method and the general flavor profile wasn't far off. So I scanned dozens of recipes online and took bits and pieces from different ones that I liked until I had an ingredient list that I liked and had on hand. I decided also that this would work well in a crockpot so in it all went and a new household favorite was born. 

As I said I sort of threw this together the first time so feel free to adjust the seasoning to suit. This recipe serves 4.


Moroccan Inspired Chicken

Ingredients:

4 Chicken thighs browned (bone in)
3 Cloves garlic crushed and roughly chopped
1 Preserved lemon roughly chopped
2 Medium onions roughly chopped
4 Carrots chopped (1/2 in pieces)
1 Orange peeled, sectioned and chopped
1 12oz can Low Sodium Chicken broth
1 Star Anise (remove before serving)
2 Bay leaves (remove before serving)
1 tsp Cumin
1/2 tsp Cayanne
1/4 - 1/2 tsp Cinnimon
1-2 tbsp Honey
4-6 Prunes quartered

Preparation:

In a pan brown the chicken, skin side down, in a small amount of butter or oil. Add the carrots and onions to the Crock Pot. Next add the chicken and the rest of the ingredients. Ideally you want the liquid to just cover everything in the pot. If it doesn't at first, check back later and as things start to release their own juices you will be able to press anything above the surface down a bit deeper. Cook on low for 6-8 hours or until the vegetables are tender and the chicken comes away easily from the bone.


This is delightful served with rice or couscous or even a nice crusty bread. The chicken will melt in your mouth and you will want to sop up every last drop of the delicious rich broth. Enjoy!


Sunday, August 12, 2012

Peerless Preserved Lemons


One of my foodie weaknesses are the delicious flavors of the East. The rich sweetness of dried fruits, the warm sensuality of the various spices and the bright punch of citrus and fresh herbs. One of my favorite ingredients are the beautiful and opulent citrons confits or preserved lemons.

These delicious beauties are lemons picked at their peak and preserved in salt and their own juices. They are used in dishes all over the world but most often are linked to Indian, Middle Eastern and Moroccan cuisine. In Cambodia there is an entire dish centered around these golden gems called Ngam nguv. It is a chicken soup using the whole preserved lemon, kafir lime leaves, cilantro, garlic and chili. It looks delicious and I hope some day to try it. Until then I have to settle with the hundreds of other delicious recipes that call for this beautiful and simple ingredient.

Now if you go to your local specialty food market you will find citrons confits will cost you a pretty penny and you won't get a lot for your money. Truthfully this is strange as the method of preservation is one of the simplest and oldest known to man. Preserved lemons are basically just lemons packed in salt.


What you will need:

2 - 1qt sterilized canning jars (or more of a smaller size jar if you prefer)
12-14 fresh medium lemons (I used about 6 per jar)
non-iodized salt, (I used Kosher) about 1/2 cup

To get started you will want to find the best quality lemons available to you.  If that means just what the grocery store has on hand so be it but the better the quality of the lemon the better the quality of your end product. Make sure to wash them well but don't scrub hard enough that you loose the essential oils in the skin. 


Next cut 10 of the lemons almost into quarters leaving just a bit of rind to hold them together. Spread each lemon open and generously coat with salt before packing into the sterilized canning jar. Repeat until you have just a half inch of head space left in the jar. I layer the jars like a trifle. Lemons, salt, more lemons and so on. Press the lemons down to release their own juices. If there is not enough juice to cover them completely juice one of the remaining lemons and ad the juice to the jar. Repeat with the second jar and remaining lemons.

Now comes the hard part. Set the jars in a window and wait. The jars should be rotated daily and given an occasional shake but they need to sit for a month before they are ready to use. These can be stored in your refrigerator for about six months.

It's as simple as that to have this delicious condiment to hand whenever you want it. Enjoy!