Pages

Bologna to Bolognese: Adventures With Food

Food is necessary. Food is fun. Food is an adventure!

My name is Shannon and this is my adventure, my love affair with food.

I hope you'll come along for the ride.

Sunday, November 30, 2014

Tossed Together Turkey Tortilla Soup


Turkey with all the trimmings, turkey sandwiches, turkey noodle casserole, you've done it all and there is still leftover turkey. If you're wracking your brain for how to spice up the last of those leftovers this is the perfect answer. Turkey Tortilla Soup!

I love turkey and I'm all over leftovers but there comes a point where just the sight of turkey leaves me cold. I've found it best to dissect the carcass Thanksgiving night and parcel it out right away into quart bags for freezing. (Freezers baby, the best appliance ever. Aside from my washing machine without which I am certain I would die. I'd at least be very dirty.) I keep the choicest breast bits for day after leftovers and sandwiches and the rest gets bagged up for future nights when I need something quick and I'm all out of fresh options. 

But I digress, my quick and easy weeknight desperation meal is usually tacos because I always have most of the ingredients on hand, except for the day I was out of ground beef.  I'd not made it to the grocery store the day before and completely forgot that I'd already used the last of the frozen ground beef so I was momentarily at a loss when I unearthed this frozen bag of turkey labeled "For Soup". I'm fairly certain I intended to make white chili but I never have the ingredients for chili in my pantry and whatever I made had to be crock pot friendly. Which is how this soup was born.

 
Turkey Tortilla Soup

Ingredients:

1 lb (approximately) shredded turkey
1 can black beans (rinsed)
1 cup frozen corn (canned or fresh is fine also)
1 onion chopped
1 tsp onion powder
1 tsp garlic powder
1 tsp paprika
1 tsp black pepper
1 tsp salt
1Tbsp cumin
1 cilantro seasoning cube (optional - fresh cilantro when serving would be better)
3 Tbsp apple cider vinegar
1 large can of stewed diced tomatoes with liquid
1/2 can of water (use the tomato can)

Preparation:

Combine all ingredients in a crock pot and cook on low for 6-8 hours. Stir occasionally and adjust seasoning to taste. Serve topped with crushed tortillas, shredded cheese and a dollop of sour cream.

It is that easy. If I were to change anything next time I'd add some chili pepper. Either a few jalapenos or birds eye chilies or some dried red pepper flakes. Whatever you have on hand.

Wednesday, November 26, 2014

Savory Sausage Cranberry Tart

 
Thanksgiving is just a few days away and if you haven't already made your menu or you need a last minute side to take to a gathering then may I suggest this gem. A rich savory treat, a little goes a long way. This combination of tart cranberries and spicy sausage in a flaky crust is to die for!
 
I've been making this tart for about 8 years now and I look forward to it every year. Initially I needed a side to take to an office party and I really wanted something with cranberries and I didn't want to take a dessert. I found a recipe for a breakfast tart and adapted it to fit my needs. You may get funny looks the first time you serve this but I promise once you've got them hooked they'll be begging for more.
 

Savory Sausage Cranberry Tart

Ingredients:

1 refrigerated pie crust (1/2 of 14.1-oz. pkg.)
1 pkg fresh cranberries divided in half (approximately)
1 pkg ground sausage (I prefer spicy or sage flavored pork sausage)
1 tsp ground sage
1 tsp thyme
1 tsp garlic powder
1-2 onions diced
4 stalks celery diced
2 eggs, lightly beaten
1 pkg (8oz) shredded cheese
½ cup whipping cream

Directions:
 
Preheat oven to 375°F.  Cook sausage in large skillet over medium heat until browned, stirring frequently. Reserving some of the fat drain the sausage and remove from skillet; set aside.
In the reserved fat in the same skillet sauté onions, celery and 1/2 the cranberries until soft. Be careful as the cranberries will occasionally pop with the heat. Allow to cool. In a large bowl combine eggs, spices, cheese, onion celery and cranberry mixture, cream and sausage; mix well. Press pie crust into a tart pan and pour in the filling. Top with remaining cranberries. Bake 30 - 45 minutes or until knife inserted in center comes out clean and crust is golden brown. 
 
 
Feel free to adjust the spice to taste. Sage can be overwhelming so if you use the sage flavored sausage or are sensitive to that flavor I might cut it in half. Additionally if you don't eat pork, turkey sausage can certainly be substituted but you may need to add some butter or add some additional seasoning to amp up the flavor. I hope this festive favorite finds a place on your holiday table. Happy Thanksgiving!


Monday, September 2, 2013

"Everything But The Kitchen Sink" Bread


It seems time for personal interest is now at somewhat of a premium in my life with my little one becoming mobile and more bold by the day. It seems each time I think I am prepared to restart my blogging I find I can't quiet get back on track. Regardless I think I'll give it another go because I miss sharing the goodies that come out of my kitchen! This week's gem was born of a craving for banana bread and the desire to not pack the baby in the car and make a trip to the market for additional ingredients. I must say I'm grateful though as resourcefulness was certainly the mother of a tasty invention "Everything But The Kitchen Sink" Bread.


It all started with a banana. I had been saving the last two icky spotted bananas for my favorite banana bread. Then the day I came downstairs to make it I found just one banana. (It turns out my husband is willing to eat very ripe fruit.) So now I was left with the ugly banana and no way to make the bread. I foraged around in the fruit bowl and came up with a wizened apple and the fridge yielded some leftover pineapple and after some consideration I decided it would do. (Really all you need is enough moisture for the bread and something that will have good flavor.)


"Everything But The Kitchen Sink" Bread

Ingredients:

2 cups flour
1/2 tsp baking powder
1/2 tsp baking soda
1/2 tsp salt
1/2 cup butter
1 cup sugar
2 eggs
1 cup mashed fruit (In this case 1 banana and 1/2 can of drained pineapple chunks)
1 chopped apple (optional)

Preparation:

In a food processor blend the pineapple and banana until  well combined. Transfer to a mixing bowl and add the other wet ingredients. Mix until well combined. In a separate bowl combine the dry ingredients. Slowly add the dry ingredients to the wet, mixing continuously.  I like to add mine in three chunks. Once your batter is smooth pour it into the greased and floured baking vessel of your choice (Loaf pan, muffin tins, bunt pan, whatever you like) and bake in a preheated oven at 350 degrees for 45-5- minutes.


This is a rich dense bread and should come out golden brown and delicious. I used my favorite Banana bread recipe as the base "Sheila's Banana Bread from the book "Bountiful Ohio Good" by James Hope and Susan Failor. I find it a simple and versatile base that always yields great bread so adapt and have fun!

Sunday, June 9, 2013

Roasted Sweet Potato Salad


Again the blog has been suspiciously silent as my attention has been diverted by a certain sweet boy. With all the new and delightful things he does each day I have slipped into a routine of easy unimaginative meals eaten quickly before little hands can snatch it off my plate and fling it to the floor. So I am of two minds with this weeks post. You should have seen this back in November and for that I am sorry. However I have this to share with you at a time when I've been too busy to make much of note and for that I am grateful. If you've followed the blog for a while you may note that this has a feel similar to the Harvest Pasta but it is it's own dish and a very nice twist on your traditional potato salad.


Roasted Sweet Potato Salad

Ingredients:

2 sweet potatoes
1 acorn squash (or firm, in season squash)
1tbsp garlic diced
1 tsp cumin
1/4 tsp allspice
1/4 tsp nutmeg
1/8 tsp cayanne
1 onion
1-2 tart apples
lemon juice
s & p to taste
2tbsp balsamic vinegar
2tbsp basil vinegar

Preparation:
 
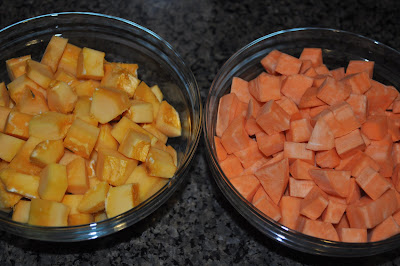
Preheat the oven to 450 f. Dice the onion and cube the sweet potatoes and squash and spread in one flat layer on an oiled baking sheet. Drizzle the vegetables with olive oil and sprinkle the spices over top. Roast until tender (approximately 30-45 minutes) but not mushy. While the vegetables are roasting dice the apple and lightly dress it with lemon juice to prevent browning. Make the dressing by combining the salt, pepper and vinegars. Once the vegetables are done roasting remove them to a bowl and allow them to cool. Add the apple and the dressing. Taste and adjust flavors as needed. Some freshly grated nutmeg and a rough dice of some tarragon would be a nice finish.

This could also be made with grilled vegetables, some rough chopped nuts would add a nice crunch  and if you prefer a creamier potato salad you could add 1/4 cup good mayonnaise. Overall a fun and tasty alternative to traditional sides and perfect for any summer barbecue.


Saturday, April 13, 2013

Brilliant Butterfinger Cake


So after a much longer hiatus than anticipated I am finally ready to settle back in and share some of the yummy goodness that has been meandering through my kitchen these past few months. I can think of no better way to celebrate the blog's return than with a decadent celebration cake I made for my husband's birthday. He loves peanut butter and if it's combined with chocolate all the better. So this year I decided to make a chocolate peanut butter cake. This is not just any chocolate peanut butter cake though. It's a three layer chocolate fudge cake dotted with peanut butter chips, sandwiched with fluffy peanut butter icing, then smothered with chocolate icing and topped with crushed Butterfingers candy.

Now we were out of town until right before his birthday so I had to cheat a little since I didn't have all the ingredients to make this from scratch. However there are numerous recipes available online both for the cake and the chocolate frosting. The chocolate frosting is actually one thing I definitely intend to change next time I make this sinful sweet. This time I used a prepared icing but next time I intend to top this cake with the thick fudge like icing my grandmother used to make for her icebox cake.

So understanding that these substitutions were for the sake of time, here's my version of a chocolate peanut butter cake.

Ingredients:

Cake:

1 recipe of your favorite chocolate cake (or 1 box mix)
1/2 package reeses peanut butter chips
1/2 cup chocolate syrup (optional to use as a substitute for some of the required liquid in the recipe)


Peanut Butter Icing:

1 cup peanut butter
5 tbsp real unsalted butter
1 cup powdered sugar
3 tbsp milk or cream
3/4 tsp vanilla
pinch of salt

Extras:

1 recipe of your favorite rich chocolate icing (or 1 can prepared chocolate icing)
1/2 bag of butterfingers fun size candy bars crushed

Preparation:

Start with your favorite chocolate cake recipe (or in a pinch box mix). Since the peanut butter is such a strong flavor you will want to have a good balance so I find that a dark chocolate cake or a fudge chocolate cake is best to make sure the chocolate flavor is intense enough. I have listed chocolate syrup as an optional ingredient. I substituted chocolate syrup for part of the water called for by my box mix to add more chocolate flavor. It worked well but is not necessary.  Prepare the cake to specifications, add in the peanut butter chips, and separate evenly into three oiled and floured 9 inch cake pans (9 inch pans are ok too). Bake until a toothpick inserted in the center comes out clean. Allow cakes to cool for at least ten minutes then remove from the pan and move to a rack to cool completely before icing.


Now for the peanut butter icing. This seemed easy enough and everything I read said it should be simple. All the same my first batch curdled on me and was a complete disaster. So I started over and was more careful. Start by creaming together the peanut butter and butter in a stand mixer. Add the powdered sugar a little at a time. Next a pinch of salt and the vanilla, then add milk a tablespoon at a time until icing reaches the desired consistency. The icing should be fluffy and smooth and about the same, only slightly thicker, consistency as regular buttercream. Don't try using margarine for this you need real butter and if you use natural peanut butter you may have some separation issues so be aware. If your icing is too thin add more powdered sugar, if it is too thick add a smidge more milk.

Now you are ready to assemble. Place your first cake layer down on your platter and top with half the peanut butter icing. Sprinkle a generous layer of crushed Butterfingers over the icing. Top with the next layer of cake, the second half of the peanut butter icing and another sprinkle of Butterfingers. Top this with the final layer of cake and ice the whole thing with chocolate icing. Decorate the top of the cake with more crushed Butterfingers mounding them up slightly in the middle.


If you can hold off digging in long enough to serve this to people it will be a hit. (If you can't, blame it on the kids or the dog! They'll love it anyway!) Oh and don't expect any leftovers.


Sunday, October 28, 2012

Luscious Lemon Coconut Trifle


Sometimes a special occasion calls for something fancy and complicated. Other times it calls for something simple and delicious that just looks complicated.  If the later is your kind of dish then Trifle is the dessert for you. There are so many versions of Trifle but the basics are the same. you need some sort of cake, some sort of liquid and something squishy. Now typically you'll see recipes call for pound cake or lady fingers but I've made trifle with gingersnaps too. 

This particular concoction was for a Scentsy party where we all brought food inspired by the different wax scents. I'm a sucker for coconut and citrus so when that combo came my way I knew I had the perfect dessert. So here you have it, Lemon Coconut Trifle.


Lemon Coconut Trifle

Ingredients:

3 Lemons
1 c sugar
12 oz whipped cream
5-8 oz lemon curd
1 cup of toasted coconut

1 recipe of Simple Sugar cake http://bolognatobolognese.blogspot.com/2012/09/simple-sugar-cake.html  made without the fruit but with the inclusion of 1 1/4 tsp coconut extract and 1/2 cup shredded coconut.

Preparation:

Start by making your cake. While it is baking spread your shredded coconut on a baking tray and just before the cake is done put the coconut in the oven to toast. Watch that it doesn't burn.

Juice the three lemons until you have 1 cup of lemon juice. Pour the lemon juice and zest of two lemons in a small pot on medium heat with one cup of sugar. stir until sugar dissolves. allow mixture to come to a boil and reduce the heat allowing it to simmer until thickened to the desired consistency. Remove from the heat and allow to cool slightly. Make your whipped cream and lemon curd ahead of time or purchase your preferred store bought variety. Before assembling the trifle gently fold the lemon curd into the whipped cream being careful not to over mix.


Now for the assembly. Tear the cake into slightly larger than bite sized pieces. In a trifle dish or glass bowl of your choice begin with a layer of cake. Pour some of the lemon syrup over top (about a tablespoon or two) sprinkle some toasted coconut next and then top with a layer of the whipped cream lemon curd mixture. Continue to layer until your Trifle dish is full ending with a layer of the whipped cream and curd mixture. Garnish with toasted coconut and lemon zest. This desert is best served after being allowed to sit but the last whipped cream layer should not be added until just before serving.


I prefer to make all of my components from scratch as I think it yields a better taste. However with that said I promised easy and fuss free so you can make this with entirely store bought components with little effort. A regular pound cake or one made from a box mix would do for your base, you can buy lemon syrup in many liquor stores or where bar supplies are sold, whipped cream is readily available and lemon curd should be easy to find in your local grocery either with the jams and jellies or in the international food aisle (think England).


Once assembled it will hold for about a week in the fridge, but that's only if it lasts that long! Of course don't forget that this is just one of many versions. If lemon and coconut don't appeal to you change it up and try a chocolate orange trifle or make up your own combination of your favorite flavors. Whatever you do have fun and make it your own!

Sunday, October 21, 2012

Handy Beef Hand Pies


While casseroles are a wonderful go to vessel for an easy evening meal, sometimes you just want a quick bite. Instead of choosing store bought microwavable pastries consider making your own easy tasty Hand Pies. Hand pies, pasties, samosas, pocket pies, whatever you call them these lovelies have been providing a quick, easy hearty lunch for ages. They are so simple to make once you've made a few you may find the more processed ones aren't so appealing anymore.

This recipe is ground beef and vegetables, very similar to what you would put in a cottage pie. In fact the main difference is that with the cottage pie you want a nice gravy where here you just want well spiced meat without the added moisture.


Handy Beef Hand Pies

Ingredients:

1 lb ground beef
1 onion
1 14 oz bag of frozen vegetables
3 medium potatoes boiled and diced
1 tsp crushed bay leaves
1 tsp ground sage
1 tsp thyme
1 tbsp minced garlic
2 tbsp Worcestershire sauce
salt and pepper to taste
Pie dough for a two crust pie (you can make your own or buy pre made crust)

Preparation: 

In a pan brown the ground beef draining off any excess fat. Add in diced onion and seasoning and saute gently until the onion is translucent. Remove from the heat, mix in the diced potatoes and mixed vegetables. Allow the mixture to cool.

Roll out your pie crust and cut into 8 equal portions. Fill each of the 8 pastry sections with a couple of tablespoons of the filling and seal each crimping the edges with a fork. Place the pies on a foil lined sheet and bake for 230 minutes in a 350 degree oven or until crust is flaky and golden brown. Remove the pies from the oven and allow to cool completely. Seal in freezer bags separated by a piece of wax paper to avoid sticking. When you are ready to reheat you can always pop them in the oven for a flakier crust or just pop them in the microwave for about 2 minutes or until heated through.

These little darlings could easily be made with whatever filling you prefer and are a great way to use up leftovers. How about that Thanksgiving turkey, dice up your leftovers and voila turkey stuffing pockets, turkey cranberry and brie pockets or get some ham and make turkey ham and cheese pockets. The options are limitless so experiment and enjoy!