Pages

Bologna to Bolognese: Adventures With Food

Food is necessary. Food is fun. Food is an adventure!

My name is Shannon and this is my adventure, my love affair with food.

I hope you'll come along for the ride.

Monday, September 12, 2011

Tiny Tasty Tarts


Sometimes it's not all about the flash, some foods just have that WOW factor naturally. Take tarts for example. Even the name tart makes me think of something sinfully delightful and just a bit dangerous. The best part about the tarts I'm going to share with you today is their incredible simplicity.

A while back I purchased some frozen puff pastry sheets for a work do and ended up not using them. So of course every time I opened the freezer the box of pastry sat there taunting me. Finally I had a stroke of inspiration, when trying to come up with a last minute birthday treat for a co-worker, and decided to make little fruit tarts with the pastry.

As I was working on a deadline I skipped personal innovation and went to the manufacturer's website where they have dozens of recipes and ideas. The following is my, only slightly, adapted version of their recipe for "Jeweled Fruit & Cream Tarts".
 

Mixed Berry Tarts 

Ingredients:
 
All-purpose flour
1/2 of a 17.3-ounce package Pepperidge Farm® Puff Pastry Sheets (1 sheet), thawed according to package directions
1 1/2 tablespoons sugar
1/2 package (4 ounces) cream cheese, softened
1 1/2 cups sliced fresh berries (I used Strawberries and Blackberries)
1/2 c peach freezer jam
 
 
Directions:

Heat the oven to 375°F. Lightly grease a muffin pan.

Sprinkle the work surface with the flour. Unfold the pastry on the floured surface. Roll the pastry into a 12 x 12-inch square. With a pastry cutter, cut 12 circles, each 4 inches in diameter. Press the pastry into the greased muffin cups. Prick the center of the pastry with a fork.

Stir the cream cheese and sugar in a small bowl until the mixture is smooth. Spoon the cream cheese mixture into pastry cups evenly. Top with 1 to 1 1/2 tablespoons of fruit (or until cup is full), and drizzle with the preserves. Bake for 15 minutes or until pastry is golden brown. Top with a fresh berry for garnish if you choose.


These were delightful. I wanted to bake mine because my blackberries were a bit tart and I wanted to coax a bit more sweetness from them. I do think I will follow the original recipe next time though and you can find it here http://www.puffpastry.com/recipedetail.aspx?recipeID=26094&rc=-1 at the Pepperidge Farm puff pastry website. It's a great product, really convenient to keep on hand and they have tons of great ideas on their website, so have fun and don't be afraid to experiment!


Sunday, August 7, 2011

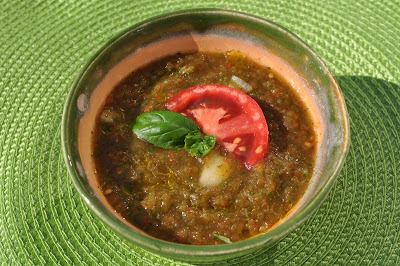
Chill Out With Cold Gazpacho Soup


This summer has been one of the hottest in many years and with the mercury continuing to rise, this bloggers kitchen has all but shut down. So this week I'm beating the heat with a cool selection of fresh summer veggies in this tasty Gazpacho soup. Gazpacho has been a long time nemesis for me but this most recent attempt has been a pleasant surprise and one I am excited to share.

Gazpacho is a cold Spanish tomato-based raw vegetable soup from the southern region of Andalusia. Some think the soup evolved from a Moorish dish of bread, olive oil garlic and water and many recipes still call for stale bread as an ingredient. This is the part where my head starts to spin and I lose my mind. No matter how hard I try or how closely I follow the directions I can not get a gazpacho that includes bread to taste good...not at all. So I started looking for other options and came up with a few good prospects including the recipe I adapted for this week's blog. The original was from Food Network's Alton Brown, but I made a few changes to fit my own tastes. There are tons of ideas out there and many branch out into very different ingredients including numerous fruits and more exotic vegetables.

The most important thing to keep in mind when making this soup is to make sure you have the best fresh produce available. If your ingredients taste fantastic your soup will too!
 
 Gazpacho Soup

Ingredients:

2 large vine-ripened tomatoes, diced
1 large cucumber, peeled, seeded and diced
1/2 cup chopped bell pepper
1/2 cup chopped sweet onion
1 jalapeno, seeded and minced
1 tbsp minced garlic
1 lime zested and juiced
3 teaspoons balsamic vinegar
2 tbsp Worcestershire sauce
1 bunch minced cilantro
1 teaspoon kosher salt
freshly ground black pepper to taste
1 tbsp Tomato paste (optional)
2 tablespoons fresh basil leaves, chiffonade (for garnish)

Preparation: 

Prepare the cucumber first and sprinkle with salt to draw out some of the liquid and remove any bitterness. Prepare the rest of the vegetables and after reserving a small amount to add back in later for texture, place remaining ingredients in a blender or food processor and puree until smooth. Pour completed puree into a bowl , add in the reserved veggies and cover. Chill soup for two hours before serving to allow flavors to develop. When you are ready to serve, garnish with a drizzle of good quality olive oil, a bit of basil and a slice of tomato.


This refreshing soup is perfect for a light lunch or a tasty first course on a hot summer night. Enjoy!

Thursday, June 30, 2011

A Touch of Southern Tradition, Ham Steak With Red Eye Gravy


For years and years I have heard and read about Ham Steaks and Red Eye Gravy. Not having had the opportunity to try it I continue to be intrigued. In an effort to give an All-American classic a fair shake I decided to give it a shot and was pleasantly surprised!

While incredibly simple this dish is delicious and eminently satifying. It's often served with eggs and biscuts or at the very least cornbread or grits. I decided to pair it with cornmeal mush and creamed spinach for a nice weeknight dinner.


Ingredients:

Ham Steak
1/2 - 1 cup of coffee
1 tsp flour (optional)

The Ham Steak itself is simple. Try to select one with a little bit of fat (not too much) along one edge. Then in a skillet over medium heat brown the ham on both sides. When the ham has reached desired doneness, Browned but not dried out or hard, remove it from the pan and trim the fat which you will then add back into the pan. Render the fat until it dissapates and deglaze pan with 1/2-1 cup of black coffee. You will notice, and traditionalists will already be knashing their teeth over this, I included and optional teaspoon of flour. Traditionally no flour is used but I really like my gravy a bit thicker so I added just a smidge.

Serve this up with on a bed of cornmeal mush with a side of creamed spinach and you have yourself a delightful weeknight dinner inspired by a great southern traditional dish.


A Taste of the Mediterranean - Spiced Couscous and Figs


Comfort food doesn't have to be bad for you. I'm a big fan of using herbs and spices to make healthy food delicious. Take this Couscous dish for example, seasoned with warm middle eastern spices and dotted with figs it offers homey comfort without the unnecessary calories.


Mediterranean Spiced Couscous with Figs 

Ingredients:

1 c couscous
5-10 dried figs
2 c boiling water
1/2 tsp allspice
1/2 tsp ginger
1/4 tsp ground clove
1 dash ground nutmeg
1/2 tbsp sesame oil (or Olive Oil if you prefer)

Preparation:

In a medium bowl combine the couscous and spices, pour the boiling water over the couscous and stir. Cover the bowl with a lid or plate and allow to set for approximatly 5 minutes or until the water has been absorbed. Quarter the figs (you may want them smaller if you use fresh figs). Once the Couscous has absorbed all the liquid fluff it with a fork and stir in the sesame oil and figs. Serve warm or cold.

The naturally nutty flavor of couscous lends itself to rich flavors and you can make it heartier by substituting broth for water or lighter by using some citrus juice, fresh herbs and fresh fruits or veggies. Play around with this wonderful ingredient and I would bet you will find a combination that is just perfect for you and your family!

Tuesday, June 14, 2011

Not Your Grandmother's Apple Pie

What could be better than hot Apple pie fresh from the oven? Apple Pearberry pie fresh from the oven!

Growing up my mother always kept a colander of fresh fruit in the kitchen ready for after school snacks or to add to a school lunch. When some of the fruit neared the end of it's fresh shelflife she would slice it up and dry it in the dehydrator for a different sort of snack.

With this in mind it should come as no surprise that a bright spot in my kitchen and one of my favorite purchases is the bright chrome fruit bowl I keep filled with nature's bounty year round. Unfortunatly, not every fruit is destined to be munched right from the bowl and when I find myself with a plethora of fruit about to go the way of the DoDo I often turn to one of my favorite solutions, pie. Pie is a glorious way to repurpose fresh fruit, and so simple and comforting. Recently I found myself with a few more apples and pears than I could eat and a bit of research led to a plan for a Pear and Apple pie. My concern was that most of the recipes I came across called for all the same spices you would find in an apple pie and I felt if I used those the delicate flavor of the pear would be lost altogether.

I asked some fellow bakers online for suggestions and did some more research and some tasting and smelling around the kitchen. I played with a few different ideas, and allowed a third fruit to jump in the mix, and viola! The Apple Pearberry Pie was born.

Apple Pearberry Pie

Ingredients:

Pear Syrup:

2 Bartlett Pears Cubed
Water
1/2 cup Sugar

Preparation:

In a small saucepan combine sugar, pears and just enough water to cover the pears. Bring mixture to a boil then reduce heat and allow to simmer until pears become very soft. Transfer the pears to a seive and press out as much juice as possible. Discard pulp. Allow the remaining liquid to simmer untikl thickened. Remove from heat and reserve until neaded for the pie filling.

Pie:

Pastry for 2 crust pie (I buy Pillsbury's from the grocer's cooler)
3 Apples cored and cubed
3 Pears cored and cubed
3-6 large strawberries
3/8 cup flour (plus some for dusting)
1/3 cup white sugar
1/3 cup brown sugar
juice and zest of 1 lemon
1 tsp Vanilla

*** (less is better than more if you are unsure of these flavors, these are STRONG spices)

1/4 tsp ground Star Anise
1/2 Tsp Ground Cardamom
scant 1/4 tsp ground clove
1 tsp ginger (powdered)
a dash of nutmeg and ground black pepper

Preparation:

In a large mixing bowl combine the cubed apples and pears with the sugar, spices, and lemon juice. (Make sure to dress the fruit with the lemon juice quickly to prevent oxidation). Allow this mixture to sit for a minute while you preheat the oven to 450 and place 1 half of the pie crust in the bottom of the pie pan. Add the vanilla and strawberries and mix well. Next gently fold in the flour and coat the fruit well. Scrape the mixture into the prepared pie dish and pour on the pear syrup taking care to distribute it evenly. Dust the top of the fruit with a bit more flour and top with the second half of the pie crust dough. cut slits for ventilation and place pie in oven. Reduce the oven temperature to 375 and bake for 60 minutes or until crust is golden brown and flakey. To keep crust edges from burning allow them to brown then wrap with tin foil for the remaining baking time. Upon removing the pie from the oven allow to cool on a wire baking rack for at least two hours. (I find that while delicious anytime, this pie improves by being allowed to sit overnight).

A note regarding the spices used in this recipe:

I wanted a more complex and unusual flavor profile for this pie and all of the spices used can be quite overwhelming if used in great quantity. If you are unsure you can reduce the amount of any or substitute a more common spice of your choosing. I found this combination to be different, refreshing and delicious. If however you just can't have a pie without Cinnamon, or can't abide the flavor of Star Anise change it up. Just remember to have fun and enjoy!

Thursday, June 9, 2011

Couture Crusts - Panzanella


In the "Tea Time" blog I shared my secret (or not so secret) obsession with afternoon tea and the delightful little finger sandwiches that have become part of that tradition. The question that always bothers me though is, "What to do with the leftover crusts"? Well, after catching part of a cooking show one afternoon, I was struck by a stroke of genius. Panzanella, a rural Italian dish that transforms day old bread (or leftover crusts) from bland to beautiful.

Panzanella

Ingredients:

2-3 tablespoons good olive oil
3-4 cups of day old bread, cubed
1 large, ripe tomato, cut into 1-inch cubes
1/2 English cucumber, unpeeled, diced
1/2 red onion diced
5 large basil leaves shredded
Salt and Pepper to taste
1 tbsp minced garlic
Juice and zest of 1 lemon
About 1 tbsp Vinegar (use your favorite, I use Basil)

Combine the bread, seasonings (including the basil and zest) and vegetables and mix well, add the lemon juice, vinegar and olive oil and mix well again then serve.

Simple and sumptuous this is a great way to reduce kitchen waste and treat your friends and family to a light but filling summer salad.

Fiesta Fare - Arroz con Garbanzos


I was looking for a fun Mexican dish to offer up just in time for Cinco de Mayo when I was sidetracked by a friend. We started talking about food and our favorite dishes and as he described a dish made by his mother I knew I'd have to take this week's blog a bit further afield by trying the very traditional Puerto Rican dish Arroz con Garbanzos. 

Arroz con Garbanzos is a hearty rice and chickpea dish with layers of flavor. It does mean making the rice from scratch but the flavor that develops as you build the dish is fantastic.

Before I dive into how to make this there is one thing I should address. The starting point, and the component that really is the star of this dish, is Sofrito. Sofrito is a combination of aromatic ingredients which have been diced and braised in cooking oil to release their flavor and develop a unique multi pourpose base used in everything from rice and meats to soups throughout the Carribian.You can purchase a version of Sofrito made by Goya in the international aisle of many larger grocery stores but it is not nearly as good as homemade. If you choose to buy it I suggest the Cilantro base instead of the one labled Sofrito because it has a brighter flavor. I used homemade Sofrito given to me by my friend and in the future I will defenitly make my own rather than buy it.  Also, from the photos you will note I have included a portion of seasoned meat which is a delightful accompaniment for this dish and full of even more flavor. First things first though, Arroz con Garbanzos!


Arroz con Garbanzos

Ingredients:
1 Tbsp Sofrito
3oz (1/2 of a 6oz can) Tomato Sauce (I usually use Contadina)
1 tbsp Vegetable Oil
2 tsp Salt (or to taste)
2 cups Rice
1 can Garbanzo Beans

Preparation:

You will want everything ready to incorporate because the rice will require constant attention for about ten minutes. 
Place a heavy bottomed pot on the stove and set the heat to high. Add 1 tbsp oil and after allowing it to heat for a few seconds add the sofrito.  Saute the Sofrito for about 15-30 seconds, then add the tomato sauce and saute for another 10-20 seconds.  Add the rice (dry), garbanzos beans, and enough water to cover the rice by about 1/4 to 1/2 an inch. (You can adjust the amount of water to get the texture you prefer).  Stir using a plastic or wooden spoon (so as not to damage your pot),  add the salt, and continue stirring, making sure the rice does not stick to the bottoms or sides of the pot.

When the water comes to a rolling boil, reduce the heat to medium high so the water maintains a steady boil, and continue stirring as before until the mixture becomes thick.  This usually happens when there is about an eighth of an inch of water covering the rice (about 6-8 minutes).  Cover the rice and reduce the heat to medium and let it steam for about 10-15 minutes. 

The next part is important and my friend explained it better that I could ...
"Check on the rice by stirring it, taking care not to disturb the layer of rice touching the bottom and sides of the pot.  This rice (called pegao) will become caramelized, and sometimes a little burned, but protects the rest of the rice from being burned. The rest of the rice, depending on your taste, will be anywhere from mushy to fluffy to al dente, depending on how much water you started with.  If it seems a bit too dry, and undercooked for your taste, then add about a 1/4 to 1/2 cup of hot water and stir, again, being careful with the bottom layer."

Once the rice is done, remove it from the heat, and serve. 

Another thought from my friend...

"After storing any leftover "top layer" rice, scrape the pegao from the sides and bottom of the pot (if there is any...some pots don't create pegao), and form portions of it into rice balls if you like.  Otherwise, discard and soak the pot overnight for easy cleaning."

Seasoned Meat

Ingredients:

1-2 lbs Beef Tenderloin (I used ground beef this time because that was what I had on hand)
1/2 - 1 tbsp Oregano
1-2 tsp garlic powder
1-2 tsp onion powder or 1 onion diced and sauted with the meat
salt and pepper to taste
Sazon (this can be found in the international aisle as well)
1 tbsp vinegar
1-2 tbsp Worcestershire sauce

Preparation:
I chose a nice piece of beef tenderloin and cut it into strips which I the seasoned with oregano, garlic, onion, Sazon, salt and pepper, a dash of Worcestershire sauce and a splash of your favorite vinegar (I prefer Balsamic). Allow the meat to marinate for about 10 minutes (If you get it ready it can marinate while you start the rice). Saute Gently over Medium heat until cooked through and serve over rice.

I hope you have as much fun as I did making this Puerto Rican favorite. The flavors seem so simple but they just burst in your mouth and leave you wanting more. Enjoy!


Sunday, April 24, 2011

Eggs Three Ways

 
Egg consumption in the United States is huge, approximated at 256 eggs per person, per year. With a population of 310 million that is 79,360,000,000 eggs each year. While the numbers are staggering it's really no surprise as eggs are an incredible versatile food by themselves not to mention their supporting role in various cakes, puddings, casseroles and yes, even meatloaf.

Today, as many of us consider how best to use the pile of brightly dyed eggs that fill our Easter baskets and decorate the holiday table, it is the perfect time to let this delicious ovoid bask in it's own glory as the star of the show. 

There are so many ways too prepare an egg. I chose these three basics for my favorite characteristic which they all share. A deliciously runny yolk perfect for dipping. Also, when showcasing such a classic ingredient I feel it really is best to start with the basics.

Soft Boiled Egg

On the stove bring a pan of water to a low boil. Immerse your egg and boil for 4-5 minutes. This should be just enough time to solidify the white of the egg but keep the yolk soft and creamy. Conveniently it is also just enough time to make the perfect toast soldiers ready for dipping!

Poached Egg

I remember the first time I had a poached egg and I was sure I would hate it. Surprisingly it was not only delicious but also easy to make.

I find it's easier to get a prettier poached egg by using an egg ring. In a pot on the stove, bring a pot of water (just enough to come to the top of the egg ring) to a low boil. Add a dash of vinegar (this helps the egg to hold together) and gently crack the egg into the ring. Next add some more hot water to the pot (this will reduce the activity to more of a simmer) and allow the egg to cook gently for about 3 minutes. Remove the egg gently and allow to drain briefly before serving. Poached eggs are best served right away. You can serve poached eggs with just about anything from soup and salads to toast or meat. For a hearty Easter brunch I whipped up a zesty potato and chorizo stew.

Potato Chorizo Stew

Ingredients

2 tablespoons extra-virgin olive oil
1 tsp garlic powder
1 large onion, chopped
2 ribs celery, chopped
3 medium size potatoes, diced
2 tsp thyme
Salt and pepper  
1/2 package chorizo sausage
1 (28-ounce) can diced tomatoes
beef broth  as needed
1 lemon and zest
2 tablespoons of your favorite vinegar (eyeball it)
 
Combine the first seven ingredients in a heavy bottom pan and saute until onions are translucent. Add some beef broth cover and cook on medium heat until potatoes are soft, about 20 minutes) Make a well in the middle of the potatoes and add the chorizo. This is a soft sausage and it must be cooked before eating. It will "melt" in the pan. after cooking it down for a few minutes stir it in with the potatoes. Add the lemon juice and zest as well as the tomatoes. Heat through and serve. Place your poached egg on top and garnish with a few zests of lemon.

Eggs In a Basket

This is a childhood favorite of mine and a perfect dish for anyone who is a child at heart. Cut a hole in the center of a slice of your favorite bread. In a frying pan melt a pat of butter and add the bread. Gently break an egg into the center hole and fry on medium heat until the white is solid on the underside. Flip the bread, being careful not to break the yolk, and finish cooking on the second side to desired consistency.


Friday, April 22, 2011

Tea Time


I find there is something about the ritual of brewing a pot of tea that calms me, but no traditional tea is complete without a selection of tea snacks and goodies. These can range anywhere from sardines on toast to delectable cream pastries and finger sandwiches.

As I prepare for an upcoming party I found I needed to test some of my most recent recipes, so today we will explore the wonderful world of tea sandwiches.

You will find any number of recipes on the net and the most common are of course, Cucumber, Watercress, egg salad, chicken salad and various cold meats. While I find all of these enjoyable I want to add a bit of panache to my sandwiches so we will focus on Four that made the top of my list.

The first is my own recipe based on a delightful dish I enjoyed at an Indian restaurant we used to frequent in England. 

Royal Curried Chicken

12 oz diced Chicken
1 tsp Curry Powder
2 tsp Apricot Jam
Pumpernickel Bread (I use Pepperidge Farms)
Butter
Ground Cardamom
Fresh Cilantro

Shred the chicken with a fork and add the curry powder and apricot jam. Mix well. Spread two slices of bread with a thin layer of butter and sprinkle with ground cardamom on one slice of bread arrange a layer of cilantro leaves and add the chicken salad. Top with the second slice of bread and cut as desired. Decorate with a sprig of Cilantro and serve.

My second choice is a very basic tea sandwich with a modern twist. The watercress sandwich.

Watercress Tea Sandwich

Watercress
Whole wheat bread
Cream Cheese (room temperature)
1 bag of your favorite flavored black tea (something mild and sweet is advised)
salt and pepper to taste

Empty the contents of one tea bag into a mortar and crush to a fine dust with a pestle (I used Lipton Vanilla Caramel tea). Add the ground tea to 1 oz of softened cream cheese and blend well. (it gets better if it has time to rest) Spread a thin layer of cream cheese mixture on two slices of bread. On one slice of bread add a generous amount of watercress. Add a dash of salt and ground black pepper and top with second slice of bread. Garnish with a leaf of cress, cut and serve.

Another time tested favorite given a flavor filled boost, this is not your grandmother's Cucumber sandwich.

Cucumber Mint Finger Sandwiches

Thinly sliced English Cucumber
Mint (thinly sliced)
Butter
Whole Wheat Bread
Salt and pepper to taste

Spread a thin layer of butter on two pieces of bread. layer with thinly sliced cucumber. Add the minced mint and salt and pepper to taste then top with the second slice of bread cut and serve. Garnish with a single mint leaf and a twist of cucumber.

My final choice is another veggie delight but this time the main satr is a fruit, the tomato!

Tomato goat cheese sandwiches

thinly sliced tomato
goat cheese
basil pesto
thinly sliced leeks
salt and pepper to taste

Mix some of the basil pesto with the room temperature goat cheese and blend well. Spread the goat cheese on whole wheat bread. add slices of tomato to one piece of bread and leeks to the other. Salt and pepper to taste then close the sandwich, cut and serve. Garnish with fresh shredded basil and leeks.

Some of the other combinations pictured here are a ham, cream cheese and jam sandwich on pumpernickel, a ham and leek with cheese on pumpernickel, radish, leek and butter on wheat and carrot and cucumber wrapped in wheat bread with wasabi cream cheese.
 

The options for fillings are limited only by your imagination so play around and get creative. Some of the sanwiches I made for this installment are still a work in progress but with a little thought and creativity almost anything you have on hand can become the next star of your afternoon tea.

Sunday, April 10, 2011

Brilliant Braciole


Weekends are my haven, a time to relax and recharge. A favorite part of that for me is Saturday Mornings when I sleep in and then laze about in bed watching the Food Network. It's a guilty pleasure I indulge in weekly and usually I enjoy it but I am not spurred to action by anything I see. Recently however I watched an episode of "Secrets of a Restaurant Chef" and I was moved by this simple and delicious recipe for Braciole.

My husband is often confounded when I talk about "Tasting" food in my head, but once you grow familiar with different ingredients and their distinct qualities I find it is easy to imagine how they will taste together just by reading the recipe. So when I heard the ingredients of this dish I couldn't wait to try it, and luckily I just happened to have almost everything on hand! While it takes some time to cook it's worth every minute, in fact the sauce alone is worth the effort.


Braciole

Ingredients:

Beef Rolls:

Extra-virgin olive oil
2 ribs celery finely diced
1 large onion, finely diced
Kosher salt
Pinch crushed red pepper flakes
2 cups day old Italian bread, cut into chunks
1/2 can of beef broth
2 tbsp Worcestershire sauce 
2 cloves garlic, smashed and finely chopped
1/2 pound baby portabello mushrooms, sliced
1/2 pound spinach or I prefer an herb salad mix (arugula, spinach, chard, frisee, radicchio, etc...)
1/2 cup grated provolone
1/2 cup grated Parmesan
2 pounds top round, cut into 1/2-inch thick slices (about 12)

Sauce:
Extra-virgin olive oil
1 large onion, finely diced
2 ribs celery finely diced
1 tsp crushed red pepper flakes (you can use less, season to taste)
Kosher salt
2 cloves garlic, smashed and finely chopped
6 oz tomato paste (1 small can - I use this to measure the water)
1 cup wine (red preferably but whatever is on hand will do)
3 fresh ripe tomatoes diced (including the pulp)
12 oz water
1/2 cup Port wine
2 tbsp Worcestershire sauce 
1tbsp balsamic vinegar
Grated Parmesan cheese, for garnish
Chopped parsley leaves, for garnish
(Special equipment: toothpicks )
Directions

For the beef rolls:

Coat a large heavy bottomed pot with olive oil, then add the onions celery and crushed red pepper. Season with salt, to taste. Cook the onions until they are soft and very aromatic, about 7 to 8 minutes.

While the onions are cooking, in a large bowl, combine the bread and the stock. Toss to combine and let sit until the bread has absorbed the stock and is very soft. Reserve.

Add the garlic to the pan with the onion and celery and saute for 2 to 3 minutes. Add the mushrooms, season with salt, to taste, and saute until the mushrooms are soft and have let off their moisture, about 4 to 5 minutes. Remove the mixture from the heat and stir in the greens.

Add the onion/mushroom mixture to the reserved bread and stir to combine. Add the provolone and Parmesan, and stir to combine. Taste and adjust seasoning if needed. Set aside.

Lay the beef slices between 2 pieces of plastic wrap and gently pound with a meat mallet to flatten and even out the slices. Put about 1/4 cup of filling on 1 end of each of the pounded beef slices and roll up. Secure the rolls with toothpicks. Repeat this process with the remaining beef and filling.

In the pot you used to cook the filling brown the beef rolls on all sides. When the beef rolls are brown on all sides, remove them from the pan and reserve. Make the sauce in the same pot.

Sauce:

Add a light coating of fresh olive oil, if needed, and add the onions celery, and crushed red pepper. Season with salt, to taste, and put the pot over medium heat. Sweat the veggies until they are translucent and very aromatic, about 7 to 8 minutes. Add the garlic and saute for another 2 to 3 minutes. Stir in the tomato paste and red wine, and cook for 6 to 8 minutes. Add the tomatoes, port and the water and season with salt, to taste. Return the beef rolls to the pan and tuck them into the sauce. Bring the sauce to a boil, then reduce the heat and simmer until the beef is very tender and flavorful, about 2 to 2 1/2 hours. Remove the toothpicks before serving. To serve, arrange 2 or 3 braciole on each serving plate. Halve 1 or 2 rolls to expose the stuffing. Spoon on some of the sauce and garnish with grated Parmesan cheese and chopped parsley.


As I usually do, I adjusted this recipe based on my personal style and what i had on hand. If you want Chef Ann Burrell's original from the show you can find it here:

http://www.foodnetwork.com/recipes/anne-burrell/braciole-recipe/index.html

Sunday, March 27, 2011

Adventures With Food: On The Road... St. Louis Bites and Brews

Schlafly Raspberry Hefeweizen

I'm always on the lookout for delicious and unusual food and when I find something out of this world I just have to share. This weekend was one of those times. My husband and I spent a Saturday touring two of the biggest breweries in St. Louis. Most people know that the gateway city is the home of Anheuser-Busch, but unless you are in it's limited distribution area you may not have heard about the Schlafly Bottleworks.

While AB has been around since 1852 and virtually set the bar for American beer, Schlafly is a relative newcomer to the brewing scene after establishing themselves as a fixture in the St. Louis market in 1991.

But it is this newcomer I intend to focus your attention on today. If you come to St. Louis definitely plan on taking the free tours offered by both companies, but make sure you're hungry when you hit Schlaflys.

Schlaflys have two locations in St. Louis, the Taproom in the downtown area and on the outskirts of the city you will find their main brewery, the Schlafly Bottleworks. Inside you can take a short tour and enjoy samples of some of their signature craft brews. (I highly recommend the Coffee Stout, Scotch Ale and the Raspberry Hefeweizen.) Then sit down and relax for a bite to eat in their restaurant.

They have a diverse menu that incorporates fantastic locally sourced ingredients. Their menu offers standard appetizers like Pretzels and Nachos done up with a twist by pairing them with Hefeweizen cheese sauce and Bison and black beans.

This brings me to the burgers. I gave in to the siren song of the Bison Burger and wished I could have gone back for seconds. The Burger came cooked to order, smothered in Gouda cheese on a toasted brioche bun with fresh lettuce onion and a side of slaw.

Bison Burger

They also serve a Vegetarian Black Bean burger that is so good my very non-vegetarian husband didn't even realize there wasn't any meat in it until I said something.  I suggest taking a look at the menu yourself and the next time you're passing through stop in for a bite!


Sunday, March 20, 2011

Comforting Cottage Pie


Just the name Cottage Pie stirs up memories of cozy pubs with a roaring wood fire and a good pint of local brew. In honor of St. Patrick's day I dusted off one of my all time favorite comfort foods and gave it a lovely Irish twist.

Cottage pie dates back to the late 1700s and was a way to use up leftover stewed meat. Typically this dish was found in more humble households where potatoes were used to make it a more filling and inexpensive meal.

You may know this dish as Shepard's Pie but that term didn't crop up until the next century. Since then there has been some tendency to affiliate Shepard's Pie with the dish when it is made with lamb or mutton and cottage pie when it is made with beef. Personally I like that way of differentiating and use it myself, though if you travel in Ireland you may find this dish referred to as either Shepard's Pie or Cottage Pie regardless of what it's made of.

Regardless of what you call it this comfort food is always wonderful and easy to make. The recipe I'm giving you today is the lazy man's version. If you have the time I encourage you to use fresh ingredients, but if not this can be easily whipped up in 45 minutes to an hour. What's the Irish twist you ask? A pint of Guinness of course!  I took a note from good Irish stew and used Guinness Stout to build my gravy instead of beef broth alone.


 Cottage Pie

Ingredients:
(serves 8)

1 1/2 pounds ground beef
1 large onion, chopped
4 ribs of celery, chopped
1 16 oz bag of frozen vegetables
1 24oz bag of steam and mash potatoes
1 15 oz can of Guinness stout
1-2 cups beef broth
1 tsp crushed bay leaves
1 tsp ground sage
2 tbsp Worcestershire sauce
salt and pepper to taste
flour (for the gravy)
2 cups of grated extra sharp cheddar cheese

Preparation:

Make mashed potatoes according to package directions and set aside for later use. (I also added some cream to smooth out the texture and flavor). In a large saucepan begin browning the meat. When most of the fat has cooked out pour it off and add the chopped onion and celery and seasonings. Saute until the vegetables are clear. Add the frozen vegetables and some of the beef broth and some of the beer. (work in 1/4 cup increments tasting as you go. You are building your gravy so you will want to make sure it is not too thin and that the beer does not overwhelm the meat.) As you add the liquid occasionally dust some flour over the contents of the pan and stir well to thicken the gravy. I used about 1 tbsp of flour, 1 cup of broth and 1/2 of the can of Guinness. Once you have the gravy to your liking pour the contents into your baking dish and drizzle the Worcestershire sauce across the top. De glaze the pan with a bit more broth or beer (just enough to get the good browned bits off) and pour over mixture. Top with shredded cheese and top that with the mashed potatoes. Smooth the potatoes to the edges of the baking dish and run a fork across it in lines to make a nice ridged pattern. Bake in a 375 F oven for 30 minutes or until the top is slightly browned and the dish is warmed through. Serve and enjoy!  (I should note that the cheese is not traditional but it is so well liked in my house that I often include it. Additionally, should you not care for the flavor of the stout you can use straight beef broth or even a nice red wine.)

Sunday, March 13, 2011

Everything But The Kitchen Sink Chowder


A bit of the spring cleaning bug carried over into the kitchen this week when I looked in the refrigerator and saw odds and ends of various vegetables lurking in my crisper drawer. There wasn't enough of any one for a complete dish but there was nothing wrong with any of them either. So, waste not want not, I chopped everything up and chucked it into  the crock pot. Soups on!

In my house soup and meatloaf serve the same very important purpose. They give me a vehicle to use up all my leftovers. For this soup I intended for it to be a chowder but I only used one potato, and a sweet potato at that so it doesn't really have a chowder texture. The beauty of it though is, it will never be the same twice. So next time it may be mostly potato with some other veggies thrown in, who knows.

That said I've listed what I put in but feel free to alter it based on your preferences or more importantly, what's lurking in your veg drawer!


Everything But The Kitchen Sink Chowder

Ingredients:
(12 servings)

1 small head of cabbage sliced thinly (like noodles)
2 sweet onions
4 cloves garlic crushed or diced
2 carrots sliced in rounds
4 parsnips sliced in rounds
the kernels from 4 ears of corn (about 1 1/2 cups)
2 jalapeno peppers without seeds (seeds left in would have been fine or more peppers)
1 head of cauliflower roughly chopped
1 sweet potato cubed 
1/2 carton of beef broth
1 carton vegetable broth
3 tbsp butter
1 tsp ground cloves
1/2 tsp ground nutmeg
1 tsp Hungarian paprika
salt and pepper to taste
1tsp onion powder
2 tsp crushed bay leaves or 3-4 whole
1 tsp parsley
1/2 tsp celery seed
Heavy cream (not to be added until the end)

Preperation:

Chop it all up and combine, except the cream and butter. Cook on low in the slow cooker for up to 8 hours. This is a lot of soup so I freeze quite a bit of it. If you also plan to do so package the portions you intend to freeze before adding the cream. The cream tends to separate after freezing. For the portion you intend to eat promptly add the cream and and butter and serve.


If you want your broth a bit thicker you can blitz some in a food processor or blender (be careful when doing this with hot liquids), or use a potato masher to crush up some of the vegetables in your pot or you could add cornstarch (make sure to mix it into a cold liquid before adding it to the pot, broth or wine will do). I found it was very nice just as it was but I can see a number of things I will change next time. Celery is a must to add, a bit of white wine would probably have added a nice depth of flavor, and more carrots, and some potatoes would be nice. Overall this was a delightful dish and I almost can't wait for my veg drawer to be full of leftovers again so I can make some more! Short, simple, to the point and delicious, happy cooking.

Sunday, March 6, 2011

Mana From Heaven...Laskiaispullat


Also called Shrovetide Buns, Laskiaispullat are my absolute favorite pastry.  They are a popular treat made across Scandanavia during the season of Lent. In Sweeden they are Selmor, in Norway, Fastelaven and in Estonia, Vastlakuklid. Whatever you call them they are heavenly. 

I remember the first time I had them in a little cafe in the Finnish town of Kauhajoki. I was there as an exchange student and my friend, a fellow exchange student, suggested stopping for coffee one afternoon. I bought one of these buns, choosing it because I knew I loved Pulla and it looked so inviting with the piped whipped cream. Well there has been no happier accident I am sure. When I bit into the decadent almond paste I was sure I'd died and gone to heaven. I fell in love that day and I think you will to! 

Now many years later this is my fist attempt at these beauties and while, in my opinion, Pysäkki Ky still has the best Laskiaispullat, these are pretty darn close!


 Laskiaispulla
(Makes 10 buns)

Ingredients:
 
Pulla Dough:

1 cup Milk
1 Tbsp (25 g) Fresh Yeast
100 g (about 7 Tbsp) Butter
1 Egg
1 tsp Cardamom
1/2 cup sugar
3cups All-purpose flour
Pinch of salt 

Filling:

Almond paste
AND
Whipped cream

Decoration:
 
1 egg (an egg wash)
Sliced Almonds and sugar (preferably large sugar crystals)
Powdered sugar (for dusting) 

Preparation:

Warm the milk slightly and combine with the yeast and some of the sugar. Stir in the egg, sugar, cardamom and salt. Start adding flour and melted butter a little at a time, alternating wet and dry ingredients. When the dough thickens, knead by hand until it's smooth, glossy and springy and comes off the bowl easily.

Allow to rise in a warm place for around 40 mins.

Once risen, tip the dough onto a floured surface and knead briefly. Form a long rope shape and cut into 10 pieces. Make little buns and place on baking paper on an oven tray. Let rise for another 30 mins under a tea towel in a warm place.

Break the egg in a small bowl and brush over the buns. Top with flaked almond or sugar drops. Bake in 325 degrees for 15-18 minutes. 

Allow to cool completely before filling .


Once ready and cooled, cut a small circle off the top, like a little cap. 


Scoop out the insides and fill with almond paste and whipped cream and put the top back on. Dust with powdered sugar and serve with your favorite coffee or hot beverage.


So, just in case you are a severe traditionalist or, like myself, were unable to find almond paste in your local grocery, I have a recipe that is simple and delicious if a little time consuming. I won't lie I did not enjoy peeling almonds...yup peeling almonds. However the end result is without a doubt top notch.
 
Almond Paste

Ingredients:

 9 oz Almonds
1 egg white
8 tbsp powdered sugar
1 tbsp orange juice
1 tsp vanilla (or almond extract if you have it)

Preparation:

In a medium saucepan bring some water to a boil then remove from heat and pour in the almonds. Allow them to sit for two minutes then drain and one at a time remove the almond skins. Toast peeled almonds until aromatic, (about 8 minutes) then blitz in a food processor until finely ground. Add the powdered sugar, egg, vanilla, and orange juice gradually allowing the food processor to fully combine into a thick paste. It will start to pull away from the sides of the bowl. Remove and seal in an air tight contained until use. Store in the refrigerator. (This can also be used in various other cakes, cookies and as a filling for danish.)

Friday, February 25, 2011

Potentate of Pastries: The King Cake

Years ago my husband went on a business trip to New Orleans and ever since he has been dying to go back. He brought back loads of beads and stories of great music, atmosphere and of course the wonderful foods. One of which was the iconic King cake. With Fat Tuesday right around the corner New Orleans bakeries continue to furiously turn out these rich yeasty goodies and when an office party presented me with the opportunity to try to make one myself I took up the challenge!

Having never eaten King Cake before I had to lean heavily on the experiences of my coworkers who had, and luckily they also found a great recipe from Chef Emeril Lagasse for me to follow.

As always I made a few adjustments to the original which you can find here:

Mostly though I stayed true to the recipe and it turned out to be quite a success. I hope you are as willing to try this desert so rich in tradition and ingredients.

King Cake

Ingredients: 
(15-22 servings)

2 envelopes active dry yeast(4 1/2 tsp)
1/2 cup granulated sugar
1-1/2 sticks (6 ounces) unsalted butter, melted
1 cup warm milk (about 110°F)
5 large egg yolks, at room temperature
4 1/2 cups bleached all-purpose flour
2 teaspoons salt
1 teaspoon freshly grated nutmeg
zest of 1 lemon
1 teaspoon vegetable oil
1 pound cream cheese, at room temperature 
1/2 tbsp vanilla
1 tbsp honey
crushed pecans to taste (about 1 cup)
2 tbsp milk

Icing:

3 cups confectioner's sugar
1 plastic king cake baby or a pecan half
3 tablespoons fresh lemon juice
Purple-, green-, and gold-tinted sugar sprinkles

Preparation:

In a microwave safe bowl roughly cut the butter and melt in the microwave in 30 second increments until the butter is melted when it is about halfway done add the milk and continue until the butter is melted and the milk is warm but not hot. Add the yeast and some of the sugar and allow to proof. (This takes about 5-10 minutes). I mix all my yeast breads by hand, but you can use a stand mixer with a dough hook if you like.  In a large mixing bowl combine the rest of the dry ingredients and the lemon zest. Make a well in the center and add the egg yolks. Add the yeast mixture and mix until all ingredients are well combined and the soft dough starts to pull away from the side of the bowl. I reserved the last 1/2 cup of flour to incorporate as I kneaded the dough just enough to make sure there are no pockets of dry ingredients. Place the dough in a covered, well oiled bowl in a warm place away from drafts, and allow to rise until doubled in size.

Meanwhile, make the filling. In a large mixing bowl, combine the cream cheese and 1 cup of the confectioner's sugar, honey, pecans, and vanilla. (I also added a pinch of ground cloves because I find it adds a compelling flavor to sweet baked goods). Blend by hand or with an electric mixer on low speed. Set aside.
Grease a baking sheet or line with parchment paper.

Halve the dough and turn it out onto a lightly floured work surface. Using your fingers, pat one half out into a rectangle. Spread the filling lengthwise over the bottom half of the dough, then flip the top half of the dough over the filling. Seal the edges, pinching the dough together. Roll the second half into a long rope and gently braid the two together shaping it into a circle and placing it on the prepared baking sheet seam side down. (Be very careful when handling the filled half of the dough as the dough is not as elastic as many yeast breads and tears easily). Pinch the ends together so there isn't a seam. Insert the king cake baby or pecan half into the ring from the bottom so that it is completely hidden by the dough.

Cover the ring with plastic wrap or a clean kitchen towel and place in a warm, draft-free place. Let the dough rise until doubled in size, about 45 minutes.
Meanwhile, preheat the oven to 350°F.
Brush the top of the risen cake with the milk. Bake until golden brown, 25 to 30 minutes. Remove from the oven and let cool completely on a wire rack.
Make the icing. Combine the lemon juice, and the remaining 2 cups confectioner's sugar in medium-size mixing bowl. Stir to blend well. With a rubber spatula, spread the icing evenly over the top of the cake. Sprinkle with the sugar crystals, alternating colors around the cake.


The cake was a hit at our office party and I have requests for more in the future so I would say this was an experiment well worth the effort! A few things to consider though. Try to make sure your ring is large enough that the center will not fill in as it rises the second time. Mine was too tight and the very center of the cake was not as done as I would have liked and I felt the outer portion had begun to get a bit dry. This is something you could easily make a day ahead because I think it got better on the second day. Most of all just have fun, and remember to tell whoever gets the "baby" that the next cake is on them!